BLOG main image
분류 전체보기 (117)
Hidden (1)
five senses (0)
safe system (77)
code (35)
tip (15)
msdn (1)
gcc (1)
java (14)
Flex (0)
출입체크 (0)
FPS 게임 (0)
C / C++ (4)
will good (0)
database (1)
Link (0)
Visitors up to today!
Today hit, Yesterday hit
daisy rss
tistory 티스토리 가입하기!
'code/java'에 해당되는 글 14건
2009. 3. 31. 05:00

Survey of AJAX/JavaScript Libraries

Please note these libraries appear in alphabetical order. If you're adding one to this list, please add it in alphabetical order rather than sticking it at the top.

There is another excellent and comprehensive list of libraries at EDevil's Weblog.

AjaxAnywhere

http://ajaxanywhere.sourceforge.net

License: Apache 2

Description: AjaxAnywhere is a simple way to enhance an existing JSP/Struts/Spring/JSF application with AJAX. It uses AJAX to refresh "zones" on a web page, therefore AjaxAnywhere doesn't require changes to the underlying code, so while it's more coarse than finely-tuned AJAX, it's also easier to implement, and doesn't bind your application to AJAX (i.e., browsers that don't support AJAX can still work.). In contrast to other solutions, AjaxAnywhere is not component-oriented. You will not find here yet another AutoComplete? component. Simply separate your web page into multiple zones, and use AjaxAnywhere to refresh only those zones that needs to be updated.

Pros:

  • Less JavaScript to develop and to maintain. Absence of commonly accepted naming convention, formatting rules, patterns makes JavaScript code messier then Java/JSP. It is extremely difficult to debug and unit-test it in multi-browser environment. Get rid of all those complexities by using AjaxAnywhere.
  • Easy to integrate. AjaxAnywhere does not require changing the underlying application code.
  • Graceful degradation and lower technical risk. Switch whenever you need between AJAX and traditional (refresh-all-page) behaviour of your web application. Your application can also support both behaviors.
  • Free open source license.

Cons:

  • AxajAnywhere? is not as dynamic as pure-JavaScript AJAX solutions. Despite that AjaxAnywhere will probably cover your basic needs, to achieve certain functionality you might need to code some JavaScript.
  • Today, you can only update a set of complete DHTML objects without breaking then apart. For example, you can update a content of a table cell or the whole table, but not the last row, for example. In later versions, we plan to implement partial DHTML update, as well.

AjaxTags component of Java Web Parts

http://javawebparts.sourceforge.net

License: Apache 2

Description: AjaxTags was originally an extended version of the Struts HTML taglib, but was made into a generic taglib (i.e., not tied to Struts) and brought under the Java Web Parts library. AjaxTags is somewhat different from most other Ajax toolkits in that it provides a declarative approach to Ajax. You configure the Ajax events you want for a given page via XML config file, including what you want to happen when a request is sent and when a response is received. This takes the form of request and response handlers. A number of rather useful handlers are provided out-of-the-box, things like updating a <div>, sending a simple XML document, transforming returned XML via XSLT, etc. All that is required to make this work on a page is to add a single tag at the end, and then one following whatever page element you want to attach an Ajax event to. Any element on a page can have an Ajax event attached to it. If this sounds interesting, it is suggested you download the binary Java Web Parts distro and play with the sample app. This includes a number of excellent examples of what AjaxTags can do.

Pros:

  • There is no Javascript coding required, unless you need or want to write a custom request/response handler, which is simply following a pattern.
  • Very easy to add Ajax functions to an existing page without changing any existing code and without adding much beyond some tags. Great for retroactively adding Ajax to an app (but perfect for new development too!)
  • Completely declarative approach to Ajax. If client-side coding is not your strong suite, you will probably love AjaxTags.
  • Has most of the basic functions you would need out-of-the-box, with the flexibility and extensibility you might need down the road.
  • Cross-browser support (IE 5.5+ and FF 1.0.7+ for sure, probably some older versions too).
  • Is well-documented with a good example app available.

Cons:

  • Because it's a taglib, it is Java-only.
  • Doesn't provide pre-existing Ajax functions like many other libraries, things like Google Suggests and such. You will have to create them yourself (although AjaxTags will make it a piece of cake!). Note that there are some cookbook examples available that shows a type-ahead suggestions application, and a double-select population application. Check them out, see how simple they were to build!
  • AjaxTags says absolutely nothing about what happens on the server, that is entirely up to you.
  • Might be some slight confusion because there is another project named AjaxTags at SourceForge. The AjaxTags in Java Web Parts existed first though, and in any case they have very different focuses. Just remember, this AjaxTags is a part of Java Web Parts, the other is not.

Dojo

http://dojotoolkit.org/

License: Academic Free License v 2.1.

Description: Dojo is an Open Source effort to create a UI toolkit that allows a larger number of web application authors to easily use the rich capabilities of modern browsers.

Pros:

  • Dev roadmap encompasses a broad range of areas needed to do browser-based app development -- Even the 0.1 release includes implementations of GUI elements, AJAX-style communication with the server, and visual effects.
  • Build system uses Ant, so core devs seem to be on friendly terms with Java.
  • Browser compatibility targets are: degrade gracefully in all cases, IE 5.5+, Firefox 1.0+, latest Safari, latest Opera
  • Most core parts of the system are unit tested (an unit tests are runnable at the command line)
  • Includes package system and build system that let you pull in only what you need
  • Comprehensive demo at http://archive.dojotoolkit.org/nightly/tests/

Cons:

DotNetRemoting Rich Web Client SDK for ASP.NET

http://www.dotnetremoting.com

License: - commercial license

Description: Rich Web Client SDK is a platform for developing rich internet applications (including AJAX). The product is available for .NET environment and includes server side DLL and a client side script

Pros:

  • No need for custom method attributes, special signatures or argument types. Does not require stub or script generation.
  • Available for .NET
  • Automatically generates the objects from the existing .Net classes.
  • Supports Hashtable and ArrayList? on the client
  • The client and the server objects are interchangeable
  • Can Invoke server methods methods from the client with classes as arguments
  • Very easy to program
  • Professional support

Cons:

  • Lacks out of the box UI components.

DWR

http://www.getahead.ltd.uk/dwr/

License: Apache 2.0

Description: DWR (Direct Web Remoting) is easy AJAX for Java. It reduces development time and the likelihood of errors by providing commonly used functions and removing almost all of the repetitive code normally associated with highly interactive web sites.

Pros:

  • Good integration with Java.
  • Extensive documentation.
  • Supports many browsers including FF/Moz, IE5.5+, Safari/Konq, Opera and IE with Active-X turned off via iframe fallback
  • Integration with many Java OSS projects (Spring, Hibernate, JDOM, XOM, Dom4J)
  • Automatically generated test pages to help diagnose problems

Cons:

  • Java-exclusive -- seems to be Java code that generates JavaScript. This limits its utility in non-Java environments, and the potential reusability by the community.

JSON-RPC-JAVA

http://oss.metaparadigm.com/jsonrpc/index.html

License: JSON-RPC-Java is licensed under the LGPL which allows use within commerical/proprietary applications (with conditions).

Description: JSON-RPC-Java is a key piece of Java web application middleware that allows JavaScript DHTML web applications to call remote methods in a Java Application Server (remote scripting) without the need for page reloading (as is the case with the vast majority of current web applications). It enables a new breed of fast and highly dynamic enterprise Java web applications (using similar techniques to Gmail and Google Suggests).

Pros:

  • Exceptionally easy to use and setup
  • Transparently maps Java objects to JavaScript objects.
  • Supports Internet Explorer, Mozilla, Firefox, Safari, Opera and Konqueror

Cons:

  • JavaScript Object Notation can be difficult to read
  • Possible scalability issues due to the use of HTTPSession

MochiKit

http://mochikit.com/

License: MIT or Academic Free License, v2.1.

Description: "MochiKit makes JavaScript suck less." MochiKit is a highly documented and well tested, suite of JavaScript libraries that] will help you get shit done, fast. We took all the good ideas we could find from our Python, Objective-C, etc. experience and adapted it to the crazy world of JavaScript.

Pros:

  • Test-driven development -- "MochiKit has HUNDREDS of tests."
  • Exhaustive documentation -- "You're unlikely to find any JavaScript code with better documentation than MochiKit. We make a point to maintain 100% documentation coverage for all of MochiKit at all times."
  • Supports latest IE, Firefox, Safari browsers

Cons:

  • Support for IE is limited to version 6. According to the lead dev on the project, "IE 5.5 might work with a little prodding."
  • Sparse visual effects library

Plex Toolkit

http://www.plextk.org - see http://www.protea-systems.com (and view source!) for sample site

License: - LGPL or GPL (optional)

Description: Open source feature-complete DHTML GUI toolkit and AJAX framework based on a Javascript/DOM implementation of Macromedia's Flex technology. Uses the almost identical markup language to Flex embedded in ordinary HTML documents for describing the UI. Binding is done with Javascript.

Pros:

  • Full set of widgets such as datagrid, tree, accordion, pulldown menus, DHTML window manager, viewstack and more
  • Markup driven (makes it easy to visually build the interface)
  • Interface components can be easily themed with CSS
  • Client side XSLT for IE and Mozilla
  • Well documented with examples.
  • Multiple remoting transport options - XMLHttpRequest?, IFrame (RSLite cookie based coming soon)
  • Back button support
  • Support for YAML serialization

Cons:

  • Lacks animation framework.

Prototype

http://prototype.conio.net/

License: MIT

Description: Prototype is a JavaScript framework that aims to ease development of dynamic web applications. Its development is driven heavily by the Ruby on Rails framework, but it can be used in any environment.

Pros:

  • Fairly ubiquitous as a foundation for other toolkits -- used in both Scriptaculous and Rico (as well as in Ruby on Rails)
  • Provides fairly low-level access to XMLHttpRequest

Cons:

  • IE support is limited to IE6.
  • No documentation other than the README: "Prototype is embarrassingly lacking in documentation. (The source code should be fairly easy to comprehend; I’m committed to using a clean style with meaningful identifiers. But I know that only goes so far.)" There's an unofficial reference page at http://www.sergiopereira.com/articles/prototype.js.html and some scattered pieces at the Scriptaculous Wiki.
  • Has no visual effects library (but see Prototype)
  • Has no built-in way of acessing AJAX result as an XML doc.
  • Modifications to Object.prototype apparently cause issues with for/in loops in interating through arrays. I could not find any information to indicate that this problem has been fixed.

Rialto

http://rialto.application-servers.com/

License: Apache 2.0

Description: Rialto is a cross browser javascript widgets library. Because it is technology agnostic it can be encapsulated in JSP, JSF, .Net or PHP graphic components.

Pros:

  • Technology Agnostic
  • Finition of widgets
  • Vision of the architecture
  • Tab drag and drop

Cons:

  • Scant documentation -- currently consists of two PDFs and a single Weblog entry.
  • Supports IE6.x and Firefox 1.x.
  • Documentation

Rico

http://openrico.org/

License: Apache 2.0

Description: An open-source JavaScript library for creating rich Internet applications. Rico provides full Ajax support, drag and drop management, and a cinematic effects library.

Pros:

  • Corporate sponsorship from Sabre Airline Solutions (Apache 2.0 License). This means that the code is driven by practical business use-cases, and user-tested in commercial applications.
  • Extensive range of functions/behaviors.

Cons:

  • Scant documentation -- currently consists of two PDFs and a single Weblog entry.
  • Supports IE5.5 and higher only. Also, no Safari support. From the Web site: "Rico has been tested on IE 5.5, IE 6, Firefox 1.0x/Win Camino/Mac, Firefox 1.0x/Mac. Currently there is no Safari or Mac IE 5.2 support. Support will be provided in a future release for Safari."
  • Has no built-in way of acessing AJAX result as an XML doc.
  • Drag-and-drop apparently broken in IE (tested in IE6)

SAJAX

http://www.modernmethod.com/sajax/

License: BSD

Description: Sajax is an open source tool to make programming websites using the Ajax framework — also known as XMLHTTPRequest or remote scripting — as easy as possible. Sajax makes it easy to call PHP, Perl or Python functions from your webpages via JavaScript without performing a browser refresh. The toolkit does 99% of the work for you so you have no excuse to not use it.

Pros: Supports many common Web-development languages.

Cons:

  • Seems limited just to AJAX -- i.e., XMLHttpRequest. No visual effects library or anything else.
  • Integrates with backend language, and has no Java or JSP support.

Scriptaculous

http://script.aculo.us/

License: MIT

Description: Script.aculo.us provides you with easy-to-use, compatible and, ultimately, totally cool! JavaScript libraries to make your web sites and web applications fly, Web 2.0 style. A lot of the more advanced Ajax support in Ruby on Rails (like visual effects, auto-completion, drag-and-drop and in-place-editing) uses this library.

Pros:

  • Well-designed site actually has some reference materials attached to each section.
  • Lots of neat visual effects.
  • Simple and easy to understand object-oriented design.
  • Although developed together with Ruby on Rails it's not dependent on Rails at all, has been used successfully at least in Java and PHP projects and should work with any framework.
  • Because of the large user-group coming from Ruby on Rails it has very good community support.

Cons:

  • No IE5.x support -- see Prototype -- Cons 1., above.

TIBCO General Interface (AJAX RIA Framework and IDE since 2001)

http://developer.tibco.com

TIBCO General Interface is a mature AJAX RIA framework that's been at work powering applicaitions at Fortune 100 and US Government organziations since 2001. Infact the framework is so mature, that TIBCO General Interface's visual development tools themselves run in the browser alongside the AJAX RIAs as you create them.

See an amazing demo in Jon Udell's coverage at InfoWorld?. http://weblog.infoworld.com/udell/2005/05/25.html

You can also download the next version of the product and get many sample applications from their developer community site via https://power.tibco.com/app/um/gi/newuser.jsp

Pros:

  • Dozens of types of extensible GUI components
  • Vector based charting package
  • Support for SOAP communication (in adiition to your basic HTTP and XML too)
  • Full visual development environment - WYSIWYG GUI layouts - step-through debugging - code completion - visual tools for connecting to services
  • An active developer community at http://power.tibco.com/GI

Cons:

  • Firefox support is in the works, but not released yet making this still something for enterprises to use where Internet Explorer is on 99.9% of business user desktops, but probably not for use on web sites that face the general population.

More info at http://developer.tibco.com

WebORB

http://www.themidnightcoders.com

License: Standard Edition is free, Professional Edition - commercial license

Description: WebORB is a platform for developing AJAX and Flash-based rich internet applications. The product is available for Java and .NET environments and includes a client side toolkit - Rich Client System to enable binding to server side objects (java, .net, web services, ejb, cold fusion), data paging and interactive messaging.

Pros:

  • Zero-changes deployment. Does not require any modifications on the server-side code, no need for custom method attributes, special signatures or argument types. Does not require stub or script generation.
  • Available for Java and .NET
  • One line API client binding. Same API to bind to any supported server-side type. Generated client-side proxy object have the same methods as the remote counter parts
  • Automatically adapts client side method arguments to the appropriate types on the server. Supports all possible argument types and return values (primitives, strings, dates, complex types, collections, data and result sets). Server-side arguments can be interfaces or abstract types
  • Includes a highly dynamic message server to allow clients to message each other. Server side code can push data to the connected clients (both AJAX and Flash)
  • Supports data paging. Clients can retrieve large data sets in chunks and efficiently page through the results.
  • Extensive security. Access to the application code can be restricted on the package/namespace, class or method level.
  • Detailed documentation.
  • Professional support

Cons:

  • Lacks out of the box UI components.

Zimbra

http://www.zimbra.com/

License: Zimbra Ajax Public License ZAPL (derived from Mozilla Public License MPL)

Description: Zimbra is a recently released client/server open source email system. Buried deep within this product is an excellent Ajax Tool Kit component library (AjaxTK?) written in Javascript. A fully featured demo of the product is available on zimbra.com, and showcases the extensive capabilities of their email client. A very large and comprehensive widget library as only avialable in commercial Ajax toolkits is now available to the open source community. Download the entire source tree to find the AJAX directory which includes example applications.

Pros:

  • Full support of drag and drop in all widgets. Widgets include data list, wizard, button, text node, rich text editor, tree, menus, etc.
  • Build system uses Ant and hosting is based on JSP and Tomcat.
  • Very strong client-side MVC architecture based; architect is ex-Javasoft lead developer.
  • Communications support for client-side SOAP, and XmlHttpRequest? as well as iframes.
  • Support for JSON serialized objects, and Javascript-based XForms.
  • Strong muli-browser capabilities: IE 5.5+, Firefox 1.0+, latest Safari
  • Hi quality widgets have commercial quaility since this is a commerical open source product.
  • Widget library is available as a separate build target set from the main product.
  • Debugging facility is built in to library, displays communications request and response.
  • License terms making it suitable for inclusion in other commercial products free of charge.

Cons:

  • Does not currently support: Keyboard commands in menus, in-place datasheet editing.
  • Does not support gracefull degradation to iframes if other transports unavailable.
  • Documentation is lacking, but PDF white paper describing widget set and drag and drop is available.

Others

Xajax

http://xajax.sourceforge.net/

Description: PHP-centric, looks very new

License: LGPL

SACK

http://twilightuniverse.com/projects/sack/

Description: New, limited feature set

License: modified X11


Last ten contributors to AjaxLibraries

출처 : Tong - 디밥님의 Web 2.0통


2009. 3. 31. 05:00

<td><nobr style="text-overflow:ellipsis;overflow:hidden;width:140px;">어쩌구 저쩌구 긴 글을 여기에 써요 하하하</nobr></td>
 
※ nobr : 독립적으로 사용하는 줄바꿈 금지 태그. 문자열이 긴경우 width 무시하고 계속 셀이 커짐
   
 - width : 140px : 140px을 기준으로 표현
 - overflow : hidden; 140px이 넘으면 보여주지 않음
 - text-overflow : ellipsis : 140px 이 넘는 문자열인 경우 자동으로 "..." 붙임.


2009. 3. 16. 05:00
http://ericmiraglia.com/blog/?p=140

Transcript:

Douglas Crockford: Welcome. I’m Doug Crockford of Yahoo! and today we’re going to talk about Ajax performance. It’s a pretty dry topic — it’s sort of a heavy topic — so we’ll ease into it by first talking about a much lighter subject: brain damage. How many of you have seen the film Memento? Brilliant film, highly recommend it. If you haven’t seen it, go get it and watch it on DVD a couple of times. The protagonist is Leonard Shelby, and he had an injury to his head which caused some pretty significant brain damage — particular damage as he is unable to form new memories. So he is constantly having to remind himself what the context of his life is, and so he keeps a large set of notes and photographs and even tattoos, which are constant reminds to him as to what the state of the world is. But it takes a long time for him to sort through that stuff and try to rediscover his current context, and so he’s constantly reintroducing himself to people, starting over, making bad decisions around the people he’s interacting with, because he really doesn’t know what’s going on around him.

If Leonard were a computer, he would be a Web Server. Because Web Servers work pretty much the same way. They have no short term memory which goes from one context to another — they’re constantly starting over, sending stuff back to the database, having to recover every time someone ‘talks’ to them. So having a conversation with such a thing has a lot of inefficiencies built into it. But the inefficiencies we’re going to talk about today are more related to what happens on the browser side of that conversation, rather than on the server.

So the web was intended to be sessionless, because being sessionless is easier to scale. But it turns out, our applications are mainly session full, and so we have to make sessions work on the sessionless technology. We use cookies for pseudosessions, so that we can correlate what would otherwise be unconnected events, and turn them into a stream of events — which would look more like a session. Unfortunately cookies enable cross site scripting or cross site request forge attacks, so it’s not a perfect solution. Also in the model, every action results in a page replacement, which is costly, because pages are heavy, complicated, multi-part things, and assembling one of those, and getting it across the wire can take a lot of time. And that definitely gets in the way of interactivity. So the web is a big step backwards in interactivity — but fortunately we can get most of that interactive potential back.

“When your only tool is a hammer, every problem looks like a webpage.” This is an adage you may have heard before — this is becoming less true because of Ajax. In the Ajax revolution, a page is an application which has a data connection to a server, and is able to update itself over time, avoiding a page replacement. So when the user does something, we send a JSON message to the server, and we can receive a JSON message as the result.

A JSON message is less work for the server to generate, it moves much faster on the wire because it’s smaller, it’s less work for the browser to parse and render than an HTML document. So, a lot of efficiencies are gained here. Here’s a time map of a web application. We start with the server on this side [motions left], the browser on the other [motions right], time running down. The first event is the browser makes a request — probably a URL or a GET Request — going to the server. The server respond with an HTML payload, which might actually be in multiple parts because it’s got images, and scripts, and a lot of other stuff in it. And it’s a much bigger thing than the GET request, so it takes lots of packets. It can take a significant amount of time. And Steve Souders has talked a lot about the things that we can do to reduce this time. The user then looks at the page for a moment, clicks on something, which will cause another request — and in the conventional web architecture, the response is another page. And this is a fairly slow cycle.

Now in Ajax — we start the same, so the page is still the way we deliver the application. But now when the user clicks on something, we’ll generate a request for some JSON data, which is about the same size as the former GET request, but the response is now much smaller. And we can do a lot of these now —so instead of the occasional big page replacement, we can have a lot of these little data replacements, or data updates, happening. So it is significantly more responsive than the old method.

One of the difficult things in designing such an application is getting the division of labour right: how should the application be divided between the browser and the server? This is something most of us don’t have much good experience with, and so that leads us to the pendulum of despair. In the first stage of the swing, everything happened on the server — the server looked on the browser as being a terminal. So all of the work is going on here, and we just saw the inefficiencies that come from that. When Ajax happened, we saw the pendulum swing to the other side — so everything’s happening on the browser now, with the view now that the server is just a file system.

I think the right place is some happy middle — so, we need to seek the middle way. And I think of that middle way as a pleasant dialogue between specialized peers. Neither is responsible for the entire application, but each is very competent at its specialty.

So when we Ajaxify an application, the client and the server are in a dialog, and we make the messages between them be as small as possible — I think that’s one of the key indications if you’re doing your protocol design properly. If your messages tend to be huge because, say, you’re trying to replicate the database, the browser — then I would say you’re not in the middle, you’re still way off to one end. The browser doesn’t need a copy of the database. It just needs, at any moment, just enough information that the user needs to see at that moment. So don’t try to rewrite the entire application in JavaScript — I think that’s not an effective way to use the browser. For one reason: the browser was not intended to do any of this stuff — and as you’ve all experienced, it doesn’t do any of this stuff very well. The browser is a very inefficient application platform, and if your application becomes bloated, performance can become very bad. So you need to try to keep the client programming as light as possible, to get as much of the functionality as you need, without making the application itself overly complex, which is a difficult thing to do.

Amazingly, the browser works, but it doesn’t work very well — it’s a very difficult platform to work with. There are significant security problems, there are significant performance problems. It simply wasn’t designed to be an application delivery system. But it got enough stuff right, perhaps by accident or perhaps by clever design, that we’re able to get a lot of the stuff done with it anyway. But it’s difficult doing Ajax in the browser because Ajax pushes the browser really hard — and as we’ll see, sometimes the browser will push back.

But before thinking about performance, I think absolutely the first thing you have to worry about is correctness. Don’t worry about optimization until you have the application working correctly. If it isn’t right, it doesn’t matter if it’s fast. But that said, test for performance as early as possible — don’t wait until you’re about to ship to decide to test to see if it’s going to be fast or not. You want to get the bad news as early in the development cycle as possible. And test in customer—like configurations — customers will have slow network connections, they’ll have slow computers. Testing on the developmer box on the local network to a developer server is probably not going to be a good test of your application. It’s really easy for the high performance of the local configuration to mask your sensitivity to latency problems.

Donald Knuth of Stanford said that “premature optimization is the root of all evil,” and by that he means ‘don’t start optimizing until you know that you need to.’ So, one place that you obviously know you need optimizing is in the start up — getting the initial page load in. And the work we’ve done here on exceptional performances is absolutely the right stuff to be looking at in order to reduce the latency of the page start up. So don’t optimize until you need to, but find out as early as possible if you do need to. Keep your code clean and correct, because clean code is much easier to optimize than sloppy code. So starting from a correct base, you’ll have a much easier time. Tweaking, I’ve found, for performance, is generally ineffective, and should be avoided. It is not effective, and I’ll show you some examples of that. Sometimes restructuring or redesign is required — that’s something we don’t like to do, because it’s hard and expensive. But sometimes that’s the only thing that works.

So let me give you an example of refactoring. Here’s a simple Fibonacci function. Fibonacci is a function for a value whose function is the sum of the two previous values, and this is a very classic way of writing it. Unfortunately, this recursive definition has some performance problems. So if I ask for the 40th Fibonacci number, it will end up calling itself over 300,000 times — or, 300,000,000 times. No matter how you try to optimize this loop, having to deal with a number that big, you’re not ever going to get it to a satisfactory level of performance. So here I can’t fiddle with the code to make it go faster — I’m going to have to do some major restructuring.

So one approach to restructuring would be to put in a memoizer — similar idea to caching, where I will remember every value that the thing created, and if I ever am asked to produce something for the same parameter, I can return the thing from the look up, rather than having to recompute it. So, here’s a function which does that. I pass it an array of values, and a fundamental function, it will return a function which when called, will look to see if it already knows the answer. And so it will return it, and if not, it will call itself, and pass its shell into that function, so that it can recurs on it. So using that, I can then plug in a simple definition of Fibonacci, here — and when I call Fibonacci on 40, it ends up calling itself 38 times. And it has kind of been doing a little bit more work in those 38 times, than it did on each individual iteration before, but we’ve got a huge reduction in the number — an optimization of about 10 million, which is significant. And that’s much better than you’re ever going to do by tweaking and fiddling. So sometimes you just have to change your algorithm.

So, getting back to the code quality. High quality code is most likely to avoid platform problems, and I recommend the Code Conventions for JavaScript Programming Language, which you can find at http://javascript.crockford.com/code.html. I also highly recommend that you use JSLint.com on all of your code. Your code should be going through without warnings — that will increase the likelihood that it’s going to work on all platforms. It’s not a guarantee, but it is a benefit. And it can catch a large class of errors that are difficult to catch otherwise. Also to improve your code quality, I recommend that you have regular code readings. Don’t wait until you’re about to release to read through the code — I recommend every week, get the whole team sitting at a table, looking at your stuff. It’s a really, really good use of your time. Experienced developers can lead by example, showing the others how stuff’s done. Novice developers can learn very quickly from the group, problems can be discovered early — you don’t have to wait until integration to find out if something’s gone wrong. And best of all — good techniques can be shared early. It’s a really good educational process.

If you finally decide you have to optimize, there are generally two ways you can think about optimizing JavaScript. There’s streamlining, which can be characterized by algorithm replacement, or work avoidance, or code removal. Sometimes we think of productivity in terms of the number of lines of code that we produce in a day, but any day when I can reduce the number of lines of code in my project, I think of that as a good day. The metrics of programming are radically different than any other human activity, where we should be rewarded for doing less, but that’s how programming works. So, these are always good things to do, and you don’t even necessarily need to wait for a performance problem to show up to consider doing these things. The other kind of optimization would be special casing. I don’t like adding special cases, I’ve tried to avoid it as much as possible — they add cruft to the code, they increase code size, increase the number of paths that you need to test. They increase the number of places you need to change when something needs to be updated, they significantly increase the likelihood that you’re going to add errors to the code. They should only be done when it’s proven to be absolutely necessary.

I recommend avoiding unnecessary displays or animation. When Ajax first occurred, we saw a lot of ‘wow’ demonstrations, like ‘wow, I didn’t know a browser could do that’ and you see things chasing around the screen, or chasing, or opening, or doing that stuff [gestures]. There are a lot of project managers, and project flippingss, who look at that stuff not understanding how those applications are supposed to deliver value — they get on that stuff instead, because it’s shiny and… But I recommend avoiding it. ‘Wow’ has a cost, and in particular as we’re looking more at widgeting as the model for application development, as we have more and more widgets, if they’re all spinning around on the screen, consuming resources, they’re going to interfere with each other and degrade the performance of the whole application. So I recommend making every widget as efficient as possible. A ‘wow’ effect is definitely worthwhile if it improves the user’s productivity, or improves the value of the experience to user. If it’s there just to show that we can do that, I think it’s a waste of our time, it’s a waste of the user’s time.

So when you’re looking at what to optimize, only speed up things that take a lot of time. If you speed up the things that don’t take up much time, you’re not going to yield much of an improvement. Here’s a map of some time — we’ve got an application which we can structure, the time spent on this application into four major pieces. If we work really hard and optimize the C code [gestures to shortest block] so that it’s using only half the time that it is now, the result is not going to be significant. Whereas if we could invest less but get a 10% improvement on the A code [gestures to longest block] that’s going to have a much bigger impact. So it doesn’t do any good to optimize that [gesture to block C], this is the big opportunity, this is the one to look at [gestures to block A].

Now, it turns out, in the browser, there’s a really big disparity in the amount of time that JavaScript itself takes. If JavaScript were infinitely fast, most pages would run at about the same speed — I’ll show you the evidence of that in a moment. The bottleneck tends to be the DOM interface — DOM is a really inefficient API. There’s a significant cost every time you touch the DOM, and each touch can result in a reflow computation, which can be very expensive. So touch the DOM lightly, if you can. It’s faster to manipulate new nodes before they are attached to the tree — once they’re attached to the tree, any manipulating of those nodes can result in another repaint. Touching unattached nodes avoids a lot of the reflow cost. Setting innerHTML does an enormous amount of work, but the browsers are really good at that — that’s basically what browsers are optimized to do, is parse HTML and turn it into trees. And it only touches the DOM once, from the JavaScript perspective, so even though it appears to be pretty inefficient, it’s actually quite efficient, comparatively. I recommend you make good use of Ajax libraries, particularly YUI — I’m a big fan of that. Effective coding reuse will make the widgets more effective.

So, this is how IE8 spends its time [diagram is displayed]. This was reported by the Microsoft team at the Velocity conference this year. So, this is the average time allocation of pages of the top 100 allexalwebpages. So they’re spending about 43% of their time doing layout, 27% of their time doing rendering, less than 3% of their time parsing HTML — again, that’s something browsers are really good at. Spending 7% of their time marshalling — that’s a cost peculiar to IE because it uses ActiveX to implement its components, and so there’s a heavy cost just for communicating between the DOM and JavaScript. 5% overhead, just messing with the DOM. CSS, formatting, a little over 8%. Jscript, about 3%. OK, so if you were really heroic, and could get your Jscript down to be really, really fast, most users are not even going to notice. It’s just a waste of time to be trying to optimize a piece of code that has that small an impact on the whole. What you need to think about is not how fast the individual JavaScript instructions are doing, but what the impact of those instructions have on the layout and rendering. So, this is the case for most pages on average — let’s look at a page which does appear to be compute bound.

This is the time spent for opening a thread on GMail, which is something that can take a noticeable amount of time. But if we look at the Jscript component, it’s still under 15%. So if we could get that to go infinitely fast, it still wouldn’t make that much of a difference. In this case, it turns out CSS formatting is chewing up most of the time. So if I were in the GMail team, running up this, I could be beating up my programmers saying ‘why is your code going so slow?’ or I could say ‘let’s schedule a meeting with Microsoft, and find out what we can do to reduce the impact of CSS expenditures in doing hovers, and other sorts of transitory effects,’ because that’s where all the time is going. So, that’s not a big deal. So you need to be aware of that when you start thinking about: ‘how am I going to make my application go faster?’

Now, there are some things which most language processors will do for you. Most compilers will remove common sub expressions, will remove loop invariants. But JavaScript doesn’t do that. The reason is that JavaScript was intended to be a very light, little, fast thing, and the time to do those optimizations could take significantly more time than the program itself was actually going to take. So it was considered not to be a good investment. But now we’re sending megabytes of JavaScript, and it’s a different model, but the compilers still don’t optimize — it’s not clear that they ever will. So there’s some optimizations it may make sense to make by hand. They’re not really justified in terms of performances, we’ve seen, but I think in some cases they actually make the code read a little better. So let me show you an example.

Here I’ve got a four loop, which I’m going to go through, a set of divs, and for each of the divs I’m going to change their styling — I’m going to change the color, and the border, and the background color. Not an uncommon thing to do in an Ajax application, but I can see some inefficiencies in this. One is, I have to compute the length of the array of divs on every iteration, because of the silly way that the fore statement works. I could factor that out — it’s probably not going to be a significant savings, but I could do that a bigger cost is, I’m computing divs by style on every itiration period. So I’m doing that three times per iteration — when I only have to do it once. And probably the biggest, depending on how big the length turns out to be, is that I’m computing the thickness parameter value on every iteration, and it’s constant, in the loop. So every time I compute that, except the first time, that’s a waste. I compute this loop this way. I create a border, which’ll precreate the thickness. Also, capture the number of divs. Then in the loop, I will also capture divs by style, so we’ll only have to get it once, and now I can change these things through that. To my eye, this actually read a little bit better — I can see border, yeah, this makes sense. I can see what I’m doing here. Do any of these changes affect the actual performance of the program? Probably not measurably, unless ‘n’ is really, really big. But I think it did make the code a little bit better and so I think this is a reasonable thing to do.

I’ve seen people do experiments where there are two ways you could say: a cat can eat a string. You need to use a plus operator, or you could do a ‘join’ on an array. And someone heard that ‘join’ is always faster, and so you see them doing cases where you concatenate two things together, they’ll make an array of two things and call ‘join’. This is strictly slower, this case, than that one. ‘Join’ is a big win if you’re concatenating a lot of stuff together. For example, if you’re doing an innerHTML build in which you’re going to build up, basically, a subdocument, and you’ve got a hundred strings that are going to get put together in order to construct that — in that case, ‘join’ is a big win. Because every time you call ‘+’, it’s going to have to compute the intermediate result of that concatenation, so it consumes more and more memory, and copies more and more memory as it’s approaching the solution. ‘Join’ avoids that. So in that case, ‘join’ is a lot faster. But if you’re just talking about two or three pieces being put together, ‘join’ is not good. So generally, the thing that reads the best will probably work, but there are some special cases where something like ‘join’ will be more effective. But again, it’s generally effective when ‘n’ is large — for small ‘n’, it doesn’t matter.

I recommend that you don’t tune for quirks. There are some operations which, in some browsers, are surprisingly slow. But I recommend that you try to avoid that as much as possible. There might be a trick that you can do which is faster on Browser A, but it might actually be slower on Browser B, and we really want to run everywhere. And the performance characteristics of the next generation of browsers may be significantly different than this one — if we prematurely optimize, we’ll be making things worse for us further on. So I recommend avoiding short term optimizations.

I also recommend that you not optimize without measuring. Our intuitions as to where our programs are spending time are usually wrong. One way you can get some data is to use dates to create timestamps between pieces of code — but even this is pretty unreliable. A single trial can be off by as much as 15ms, which is huge compared to the time most JavaScript statements are going to be running, so that’s a lot of noise. And even with accurate measurement, that can still lead to wrong conclusions. So measurement is something that has to be done with a lot of care. And evaluating the results also requires a lot of care.

[Audience member raises hand]

Douglas: Yeah? Oh, am I aware of any tools or instruments the JavaScript engine in the browsers so that you can get better statistics on this stuff? I’m not yet, but I’m aware of some stuff which is coming — new firebug plug—ins and things like that, which will give us a better indication as to where the time’s going. But currently, the state of tools is shockingly awful.

So, what do I mean when I talk about ‘n’? ‘N’ is the number of times that we do something. It’s often related to the number of data items that are being operated on. If an operation is performed only once, it’s not worth optimizing — but it turns out, if you look inside of it you may find that there’s something that’s happening more often. So the analysis of applications is strongly related to the analysis algorithms, and some of the tools and models that we can look at there can help us here.

So suppose we were working on an array of things. The amount of time that we spend doing that can be mapped according to the length of the array. So, there’s some amount of start up time, which is the time to set up the loop and perhaps to turn down the loop, on the fixed overhead of that operation. And then we have a line which descends as the number of pieces of data increases. And the slope of that line is determined by the efficiency of the code, or the amount of work that that code has to do. So a really slow loop will have a line like that [gestures vertically] and a really fast loop will have a line that’s almost horizontal.

So you can think of optimization as trying to change the slope of the line. Now, the reason you want to control the slope of the line is because of the axis of error. If we cross the inefficiency line, then a lot of the interactive benefits that we were hoping to get by making the user more productive, will be lost. They’ll be knocked out of flow, and they’ll actually start getting irritated — they might not even know why, but they’ll be irritated at these periods of waiting that are being imposed on them. They might not even notice, they’ll just get cranky using your application, which sets you up for some support phone calls and other problems — so you don’t want to be doing that. But even worse is, if you cross the frustration line. At this point, they become… they know that they’re being kept waiting, and it’s irritating, so satisfaction goes way down. But even worse than that is the failure line. This is the line where the browser puts up an alert, saying ‘do you want to kill the script?’ or maybe the browser locks up, or maybe they just get tired of waiting and they close the thing. This is a disaster, this is total failure. So you don’t want to do that either, so you want to not cross any of those lines, if you can avoid it — and you certainly never want to cross that one [gestures to failure line].

So to do that, that’s when you start thinking about optimizing: we’re crossing the line, we need to get down. One way we can think about it is changing the shape of the line. Sometimes if you change the algorithm, you might increase the overhead time of the loop — but in exchange for that, you can change the slope. And so, in many cases, getting a different algorithm can have a very good effect. Now, if the kind of data you’re dealing with has interactions in it, then you may be looking at an ‘n log n’ curve. In this case, changing the shape of the line won’t have much of a help. Or if it’s an n squared line, which is even worse — doubling the efficiency of this [gestures to point on line] only moves it slightly. So the number of cases that you can handle before you fail is only marginally increased by an heroic attempt to optimize — so that’s not a good use of your time.

So the most effective way to make programs faster is to make ‘n’ smaller. And Ajax is really good for that, Ajax allows for just—in—time data delivery — so we don’t need to show the user everything they’re ever going to want to see, we just need to have on hand what they need to see right now. And when they need to get more, we can get more in there really fast, by having lots of short little packets in this dialog.

One final warning is: The Wall. The Wall is the thing in the browser that when you hit it, it hurts really bad. We saw a problem in [Yahoo!] Photos, back when there was [Yahoo!] Photos [which was replaced by Flickr], where they were trying to do some…they had a light table, on which you could have a hundred pictures on screen. And then you could go to the next view, which would be another hundred pictures, and so on. And thinking they wanted to make it faster to go back and forth, they would cache all the structures from the previous view. But what they found was the next view — or, the first view, came up really fast, but the second view took a half second more, the next view took a second more, and then the next view a second and a half more, and so on. And pretty soon you reached the failure line. And it turned out that what they had done — intending to be optimizing, was actually slowing everything down. That the working set the browser was using, the memory it was using in order to keep all those previous views, which were being saved as full HTML fragments, was huge. And so the system was spending all of its time doing memory management, and there was very little time left for actually running the application. So the solution was to stop trying to optimize prematurely, and just try to make the basic process of loading one of these views as fast as possible. So the only thing that cached was the JSON data, which was pretty small, and they would rebuild everything every time — which didn’t take all that much time, because browsers are really good at that. And in doing that, they managed to get the performance down to a linear place again, where every view took the same amount of time.

These problems will always exist in browsers, probably. So the thing we need to be prepared to do is to back off, to rethink our applications, to rethink our approach. Because while the limits are not well understood, and not well advertised, they are definitely out there. And when you hit them, your application will fail, and you don’t want to do that. So you need to be prepared to rethink not only how you build the application, but even what the application needs to do — can it even work in browsers. For the most part, it appears to be ‘yes’, but you need to think responsively, think conversationally. The gaps don’t work very well in this device… So, that’s all I have to say about performance. Thank you.

The question was, did they have a way of flushing what they were keeping for each view? And it turned out they did. What they did was, they built a subtree in the DOM for each view of a hundred images, a hundred tiles, and they would disconnect it from the DOM and then build another one, and keep a pointer to it, so they could reclaim it. And then they’d put that one in there. And so they had this huge set of DOM fragments. And that was the thing that was slowing them down. Just having to manage that much stuff was a huge inefficiency for the browser. And they did that thinking they were optimizing — so that when you hit the back button, boom — everything’s there, and they can go back really fast. And then if you want to go forward again, you can go really fast. So they imagined they wanted to do that, and do that really effectively, but it turned out trying to enable that prevented that from working. So a lot of the things that happen in the browser are counterintuitive. So generally, the simplest approach is probably going to be the most effective.

That’s right, you don’t know what’s going to take the time — and so it becomes a difficult problem. You shouldn’t optimize until you know you need to. You need to optimize early, but you won’t be able to know until the application is substantially done. So, it’s hard.

Audience member: So it’ a matter of stay open to…

Douglas: That, and trying to stay in [...]. If you can keep testing constantly throughout the process, not wait until the end for everything to come together, that’s probably going to give you the best hope of having a chance to correct and identify performance problems.

Right, so the question is where to do paginations, essentially. Or caching. So, once approach is to have the server do the paginations, so it sends out one chunk at a time — and most websites work that way, because that’s the most responsive way to deliver the data. I can deliver 100 lines faster than I can deliver 1,000 lines, and so users like that — even though it means that they’re going to have to click some buttons to see the other 90% of it, people have learned to do that. The other approach is, take the entire data set and send that to the browser, and let the browser partition it out. And that has pretty much the same performance problems as the other approach, where we send all 1,000 in one page. What I recommend is doing it in chunks, and each chunk can be a pair of JSON messages, and request the chunks as you need them. That appears to be the fastest way the present the stuff to the user. Now, it’s harder to program that way — it’s easier for us if it’s one complete data set, and then we go ‘oh, we’ll just take what we need from that’. So that’s easy for us, but it does not give us the best performance. And as the data set gets bigger, it’s certain to fail.

Right. So, can we use canvass and CVS tricks to do well, is that a more effective way to accomplish that? Probably, at least in the few browsers that implement them currently. Over time, the browsers are promising to take better advantage of the graphics hardware, which standard equipment now on virtually all PCs — so it’s unlikely that we’ll be able to get that performance boost directly from JavaScript. So it’s likely that it’s going to be on the browser side, and those sorts of components. So eventually, that’s probably going to be a good approach — although it’s not clear how well that stuff’s going to play out in the mobile devices, and that’s becoming important too, so everything’s probably going to get harder and more complicated. That’s the forecast for 2009.


2008. 12. 16. 05:00


Using XML, XPath, and XSLT with JavaScript

There are several JavaScript XML libraries available to try to provide a cross-browser XML library. I've previously cited zXML in my Inline SVG article, there's also Sarissa and XML for <Script> and I'm sure others.

However, when I started using them I discovered various problems and limitations with them for what I needed to do. So, I decided to write my own cross-browser XML routines. I wanted an XML library that was as lightweight as possible, doing just what I needed and utilizing as much of the built in browser capabilities as possible.

In this article, I will first present a simple XML class which just holds the XML DOM object returned from an AJAX request and provides functions to get and change node values based on XPaths. Secondly, I will give a simple XSLT class to preform XSL Transformations.

The complete code for the XML and XSL library is available here

XML


First off is the constructor which determined if we will be using IE (ActiveX) functions or W3C standard functions for XML manipulation and either stores the XML DOM returned as the responseXML from an XMLHttpRequest(XHR) or creates an empty DOM object for later manipulation.
//
// XML
//
function XML(xmlDom) {
this.isIE = window.ActiveXObject;
if (xmlDom != null) {
this.xmlDom = xmlDom;
} else {
// create an empty document
if (this.isIE) {
Try.these (
function() { axDom = new ActiveXObject("MSXML2.DOMDocument.5.0"); },
function() { axDom = new ActiveXObject("MSXML2.DOMDocument.4.0"); },
function() { axDom = new ActiveXObject("MSXML2.DOMDocument.3.0"); },
function() { axDom = new ActiveXObject("MSXML2.DOMDocument"); },
function() { axDom = new ActiveXObject("Microsoft.XmlDom"); }
);
this.xmlDom = axDom;
} else {
this.xmlDom = document.implementation.createDocument("", "", null);
}
}
};

In case you're not getting the XML data from an XHR response, I also provided a load function to load an XML file from an URL.
// load
//
// Loads an XML file from an URL
XML.prototype.load = function(url) {
this.xmlDom.async = false;
this.xmlDom.load(url);
};

Next, I want to be able to find a single node in the XML DOM based on an XPath. The getNode function will do that for me.
// getNode
//
// get a single node from the XML DOM using the XPath
XML.prototype.getNode = function(xpath) {
if (this.isIE) {
var result = this.xmlDom.selectSingleNode(xpath);
} else {
var evaluator = new XPathEvaluator();
var result = evaluator.evaluate(xpath, this.xmlDom, null, XPathResult.FIRST_ORDERED_NODE_TYPE, null);
}
return result;
};

More often, I don't need the actual DOM node object, but the value of that node, so I provide the getNodeValue a function to get the value of a node.
// getNodeValue
//
// get the value of a the element specified by the XPath in the XML DOM
XML.prototype.getNodeValue = function(xpath) {
var value = null;
try {
var node = this.getNode(xpath);

if (this.isIE &&amp; node) {
value = node.text;
} else if (!this.isIE && node.singleNodeValue) {
value = node.singleNodeValue.textContent;
}
} catch (e) {}

return value;
};

If you're just looking for a particular node/value, the previous functions are fine, but more often you need a group of node or node values (ex. all the book titles). So, the full JavaScript file also contains corresponding functions to get multiple nodes (getNodes) and node values as an array (getNodeValues).

At some point, you'll probably want to access this XML DOM as XML data (string), so we need a function to serialize the XML from the DOM to a String. The getNodeAsXml function will do that for you. If you pass in the root XPath ("/") it will serialize the complete XML file. Also, the included prettyPrintXml function can be used to escape the HTML characters.
// getNodeAsXml
//
// get the XML contents of a node specified by the XPath
XML.prototype.getNodeAsXml = function(xpath) {
var str = null;
var aNode = this.getNode(xpath);
try {
if (this.isIE) {
str = aNode.xml;
} else {
var serializer = new XMLSerializer();
str = serializer.serializeToString(aNode.singleNodeValue);
}
} catch (e) {
str = "ERROR: No such node in XML";
}
return str;
};


So far, we've only read the XML data we received. But we may also want to change the contents of the XML. So, here are the functions necessary to change existing node values (updateNodeValue), add new nodes/values (insertNode), and delete existing nodes (removeNode).

Note: the XPaths used for node insertions cannot be overly complex as I wanted to keep this library simple.
// updateNodeValue
//
// update a specific element value in the XML DOM
XML.prototype.updateNodeValue = function(xpath, newvalue) {
var node = this.getNode(xpath);
var changeMade = false;
newvalue = newvalue.trim();

if (this.isIE &&amp; node) {
if (node.text != newvalue) {
node.text = newvalue;
changeMade = true;
}
} else if (!this.isIE && node.singleNodeValue) {
if (node.singleNodeValue.textContent != newvalue) {
node.singleNodeValue.textContent = newvalue;
changeMade = true;
}
} else {
if (newvalue.length > 0) {
this.insertNode(xpath);
changeMade = this.updateNodeValue(xpath, newvalue);
}
}

return changeMade;
};

// insertNode
//
// insert a new element (node) into the XML document based on the XPath
XML.prototype.insertNode = function(xpath) {
var xpathComponents = xpath.split("/");
var newChildName = xpathComponents.last();
var parentPath = xpath.substr(0, xpath.length - newChildName.length - 1);
var qualifierLoc = newChildName.indexOf("[");
// remove qualifier for node being added
if (qualifierLoc != -1) {
newChildName = newChildName.substr(0, qualifierLoc);
}
var node = this.getNode(parentPath);
var newChild = null;
if (this.isIE && node) {
newChild = this.xmlDom.createElement(newChildName);
node.appendChild(newChild);
} else if ((!this.isIE) && node.singleNodeValue) {
newChild = this.xmlDom.createElement(newChildName);
node.singleNodeValue.appendChild(newChild);
} else {
// add the parent, then re-try to add this child
var parentNode = this.insertNode(parentPath);
newChild = this.xmlDom.createElement(newChildName);
parentNode.appendChild(newChild);
}
return newChild;
};

// removeNode
//
// remove an element (node) from the XML document based on the xpath
XML.prototype.removeNode = function(xpath) {
var node = this.getNode(xpath);
var changed = false;
if (this.isIE &&amp; node) {
node.parentNode.removeChild(node);
changed = true;
} else if ((!this.isIE) && node.singleNodeValue) {
node.singleNodeValue.parentNode.removeChild(node.singleNodeValue);
changed = true;
}
return changed;
};


You should now be able to fully read and manipulate XML using XPaths.

For any significant reformatting or processing of the XML, you'll probably want to utilize XSLT. So, next I'll provide a simple XSLT class. It will preload (into a DOM object) an XSL file in its constructor. This provides rapid transformations of new XML data passed in to it's transform function (including parameters).

First, the constructor which requires an URL pointing to the XSL file to be used for transformations. It does not accept a DOM object like the XML class did as it is assumed that the XSL (layout information) is more-or-less static and stored in a file whereas the XML data would most likely be dynamic and received via an XHR request.
//
// XSLT Processor
//
function XSLT(xslUrl) {
this.isIE = window.ActiveXObject;
if (this.isIE) {
var xslDom = new ActiveXObject("MSXML2.FreeThreadedDOMDocument");
xslDom.async = false;
xslDom.load(xslUrl);
if (xslDom.parseError.errorCode != 0) {
var strErrMsg = "Problem Parsing Style Sheet:\n" +
" Error #: " + xslDom.parseError.errorCode + "\n" +
" Description: " + xslDom.parseError.reason + "\n" +
" In file: " + xslDom.parseError.url + "\n" +
" Line #: " + xslDom.parseError.line + "\n" +
" Character # in line: " + xslDom.parseError.linepos + "\n" +
" Character # in file: " + xslDom.parseError.filepos + "\n" +
" Source line: " + xslDom.parseError.srcText;
alert(strErrMsg);
return false;
}
var xslTemplate = new ActiveXObject("MSXML2.XSLTemplate");
xslTemplate.stylesheet = xslDom;
this.xslProcessor = xslTemplate.createProcessor();
} else {
var xslDom = document.implementation.createDocument("", "", null);
xslDom.async = false;
xslDom.load(xslUrl);
this.xslProcessor = new XSLTProcessor();
this.xslProcessor.importStylesheet(xslDom);
}
};

Finally, the transform function will preform the XSL transformation and return the result. It accepts parameters to be passed to the XSL as an associative array of parameter name and value pairs.
// transform
//
// Transform an XML document
XSLT.prototype.transform = function(xml, params) {
// set stylesheet parameters
for (var param in params) {
if (typeof params[param] != 'function') {
if (this.isIE) {
this.xslProcessor.addParameter(param, params[param]);
} else {
this.xslProcessor.setParameter(null, param, params[param]);
}
}
}

if (this.isIE) {
this.xslProcessor.input = xml.xmlDom;
this.xslProcessor.transform();
var output = this.xslProcessor.output;
} else {
var resultDOM = this.xslProcessor.transformToDocument(xml.xmlDom);
var serializer = new XMLSerializer();
var output = serializer.serializeToString(resultDOM);
}
return output;
};


You should now be able to easily utilize XML and XSL on your web pages. An example usage of this XML/XSLT library would be to first build an XSLT object during the page initialization (onload).

xslProcessor = new XSLT(xslUrl);

Then, when XML responses are received from an AJAX request, process them. For example,
// get the XML data
try {
var xmlData = new XML(request.responseXML);
} catch (e) {
alert(request.responseText);
}

// get the username out of the XML
var userName = xmlData.getNodeValue('//userName');

// transform the XML to some HTML content
var newData = xslProcessor.transform(xmlData, {'param':'value'});
document.getElementById('someDiv').innerHTML = newData;


Update (February 27, 2007): I previously had a function in my XML class to generate valid HTML for the XML, but I've now modified it to use Oliver Becker's XML to HTML Verbatim Formatter with Syntax Highlighting stylesheet to format the XML. If that is not available, it will default to simply serialize the XML and convert the special characters. The code for this looks like:

/ Define a class variable which can be used to apply a style sheet to
// the XML for format it to HTML
XML.htmlFormatter = new XSLT("xsl/xmlverbatim.xsl");

// toHTML
//
// Transform the XML into formatted HTML
//
XML.prototype.toHTML = function() {
var html = null;
if (XML.htmlFormatter) {
html = XML.htmlFormatter.transform(this);
} else {
html = this.getNodeAsXml('/');
if (html != null) {
html = html.replace(/&/g, "&");
html = html.replace(/</g, "&lt;");
html = html.replace(/>/g, "&gt;<br/>");
}
}
return html;
}


As before, the complete package is available to download

Update (March 7, 2007): I have updated this package to utilize Google's AJAXSLT XSL-T implementation when a native JavaScript XSLT function is not available. I need to test it more before releasing it however.

http://blog.pothoven.net/2006/11/using-xml-xpath-and-xslt-with.html
2008. 12. 9. 05:00


보통 호출 방법
// 플래시 내부 함수 호출
function thisMovie(movieName) {
    if (navigator.appName.indexOf("Microsoft") != -1) {
        return window[movieName]
    }
    else {
        return document[movieName]
    }
}

// 플래시에 내부에 있는 setSafecardMark 함수를 호출
thisMovie("safecard").setSafecardMark(index,length);

그러나 위의 방법들이 안된다.. 그러면 아래와 같이 한다.

1. Dom을 이용해 플래쉬에 접근하는 경우 E에서는 Object의 ID를 FF에서는 Embed의 ID를 사용하게 된다. 즉 아래와 같다.

     <object id="id1"><embed src="test.swf" id="id1" /></object>

위와 같이 설정하고

      document.getElementById('id1')

라고 하면 IE에서는 정상동작하겠지만 FF에서는 Object를 참조하기 때문에 오동작하게된다.

2. <form></form> 안에서 사용하면 안된다.
<form>
       form으로 둘러싸인 플래쉬 무비에서 ExternalInterface를 addCall 하면 해당 플래쉬의 ID를 찾을 수 없다는 에러를 발생시킨다.
</form>

이 문제는 아래의 코드를 사용해 해결할 수 있다. ExternalInterface를 사용하는 페이지에 아래의 로직을 인클루드시킨다.

<script type="javascript/text">
function ExternalInterfaceManager() {
   this.registerMovie = function(movieName) {


   if(!window.fakeMovies) window.fakeMovies = new Array();
      window.fakeMovies[window.fakeMovies.length] = movieName;
   }


   this.initialize = function() {
      if(document.all) {
         if(window.fakeMovies) {
            for(i=0;i<window.fakeMovies.length;i++) {
               window[window.fakeMovies[i]] = new Object();
            }


            window.onload = initializeExternalInterface;
         }
      }
   }
}


function initializeExternalInterface() {
   for(i=0;i<window.fakeMovies.length;i++) {
      var movieName = window.fakeMovies[i];
      var fakeMovie = window[movieName];
      var realMovie = document.getElementById(movieName);


      for(var method in fakeMovie) {
         realMovie[method] = function() {
            flashFunction = "<invoke name=\"" + method.toString() + "\" returntype=\"javascript\">" +       __flash__argumentsToXML(arguments, 0) + "</invoke>";this.CallFunction(flashFunction);
         }
      }


      window[movieName] = realMovie;
   }
}


</script>
   플래쉬를 표시하기 전 아래의 자바스크립트를 실행한다.
<script type="text/javascript">
//<![CDATA[var eim = new ExternalInterfaceManager();

eim.registerMovie("flashID");

eim.initialize();
//]]>
</script>


위의 방법보다 간단한 방법이라 소개된 자료
 function Flash(id, url, width, height)
{
     var str;
     str = '<object classid="clsid:d27cdb6e-ae6d-11cf-96b8-444553540000" codebase="http://fpdownload.macromedia.com/pub/shockwave/cabs/flash/swflash.cab#version=8,0,0,0" width="' + width + '" height="' + height + '" id="' + id + '" align="middle">';
     str += '<param name="allowScriptAccess" value="sameDomain" />';
     str += '<param name="movie" value="' + url + '" /><param name="quality" value="high" /><param name="bgcolor" value="#ffffff" />';
     str += '<embed src="' + url + '" quality="high" bgcolor="#ffffff" width="' + width + '" height="' + height + '" id="'+ id +'" name="' + id + '" align="middle" allowScriptAccess="sameDomain" type="application/x-shockwave-flash" pluginspage="http://www.macromedia.com/go/getflashplayer" />';
     str += '</object>';
 
     document.write(str);
 
     //Flash의 ExternalInterface가 Form Tag내에서 오류나는 버그를 해결하는 코드
     eval("window." + id + " = document.getElementById('" + id + "');");
}


2008. 12. 3. 05:00
Web에서 자바스크립트의 사용은 웹을 유용하게 한다. 웹에서 사용하는 자바스크립트 이벤트는 다양하지만, 가장 많이 사용하는 것이 onClick 이벤트가 아닌가 한다. 사용자가 마우스로 클릭을 했을 때, 어떤 자바스크립트 함수를 호출하도록 하는 것이 onClick 이벤트이다.

특히 a(anchor) 태그와 함께 사용할 때, onClick 이벤트를 자주 사용하는데, 이 이유는 크게 세 가지가 있다.
  1. 이동되는 경로(URL)을 사용자에게 숨기기 위해서
  2. form 방식으로 페이지를 이동하여, 새로운 페이지에 값을 넘겨주기 쉽게 하기 위해서
  3. 페이지를 이동하기 전에 자바스크립트 함수를 호출하여, 메시지를 보여주거나 입력값을 체크하기 위해서

결국, a 태그가 페이지를 이동하는 역할을 함에도 불구하고 onClick를 사용하는 이유는 위에서 설명했다. 그러면 a 태그의 href를 무시하고 onClick 이벤트가 참조하는 자바스크립트 함수를 호출하는 방법은 여러가지가 있다. 먼저 자주 사용되는 것부터 확인해보자.

 1. <a href="javascript:alert('naver');"> Naver </a>
 2. <a href="#" onClick="alert('daum');"> Daum </a>
 3. <a href="javascript:void(0);"  onClick="alert('nate');"> Nate </a>

1번은 href의 값에 URL 대신 javascript 함수를 호출하도록 하였다. 클릭하면 바로 경고창이 뜨게 된다. 이 방법은 브라우저 하단의 회색의 상태바에 javascript:alert('naver');가 보인다.
2번은 자바스크립트가 호출하는 함수를 숨기기 위해 #을 사용했다. 하지만 이것은 함수에서 페이지가 이동하지 않으면, 브라우저가 이동할 곳을 잃어버리고 페이지의 상단으로 이동해버린다는 단점이 있다.
3번은 이것을 해결하기 위해 자바스크립트에서 Null과 마찬가지인 void(0)을 사용했다. 처음에는 이것의 문제를 몰랐는데, Internet Explorer 6 을 사용하는 사용자가 페이지가 이동하지 않는다고 이야기하여 이것의 문제를 알게 되었다. IE 7 이나 FireFox에서는 이상없이 처리되었다.

이 문제를 해결하기 위해 여러 곳을 찾아보다가 다음과 같은 해결책을 찾게 되었다.

 4. <a href="#" onClick="alert('dooji'); return false;"> dooji.com </a>
 5. <a href="javascript:void(0);"  onClick="alert('tistory'); return false;"> dooji.tistory.com </a>

바로 return false; 를 호출하는 함수 뒤에 추가하는 것이다. 이것은 href에 #을 사용해도 페이지 위로 이동하지 않는다. href의 값은 자신이 좋아하는 취향에 따라 적용하면 될 것 같다. 왜 이런 현상이 일어나는 지에 대해서는 좀 더 알아본 후에 적도록 하겠다.

2008. 7. 18. 05:00


Java Simple Daemon

http://kldp.net/projects/jsd/

뭐에 쓰는 물건인고?
Java Simple Daemon은 자바를 이용해서 데몬 프로그램을 작성하도록 도와주는 프레임워크이다(비록 프레임워크라고 부르기엔 너무도 작지만.. ^^).
가끔씩 특정 디렉토리에 들어오는 파일을 감시해서 파일이 들어오면 그 파일을 DB에 넣기만 하거나, 혹은 어떤 방식으로든 메시지를 받아서 받은 메시지를 가공해 다른 쪽에 메시지로 넘겨 주거나 하는 등의 역할을 하는 그런 프로그램을 자바로 짤 경우가 있다.
이러한 프로그램들은 일반적으로 그래픽 사용자 인터페이스(GUI)나 화면 출력이 필요 없이 파일로 로그만 남기고 자기 할 작업을 한다. 이러한 프로그램을 데몬(Daemon)이라 부른다.
자바로 이러한 데몬을 작성할 경우, 데몬을 실행시키는 것은 문제가 없다.


$ nohup java some.Daemon &
이러한 식으로 실행하면 된다. 헌데 문제는 종료이다. 프로그램과 의사 소통할 무슨 방법이 없기 때문에 Unix에서 ps -ef명령으로 "java" 프로세스를 찾아서 kill명령을 내리거나 윈도우의 경우에는 프로세스 종료를 시킬 수 밖에 없다. 이러한 문제를 해결하기 위해 만든 것이 Java Simple Daemon(이하 JSD)이다.

프로젝트 홈

프로젝트 개발 홈
사용자/개발자 게시판

다운로드
Java Simple Daemon 다운로드 목록
어찌 작동하는고?
원리는 단순하다. 데몬 역할을 하는 자바 클래스를 실행시켜주면서 쓰레드가 하나 떠서 사용자의 홈 디렉토리(Unix에서 $HOME 환경변수가 가리키는 디렉토리)에 특별한 파일이 존재하는지를 검사한다. 만약 그 특별한 파일이 존재한다면 JVM을 자동으로 종료시켜준다. JSD는 그 특별한 파일이 있는지 검사하는 역할과, 그 파일을 생성 시켜주는 역할을 한다.


덤으로, JSD는 데몬 클래스에 따라 락(Lock) 파일도 생성해준다. 홈 디렉토리에 락 파일이 존재할 경우, 데몬을 다시 띄우려고 하면 데몬 띄우기를 거부한다.

사용하기

데몬 클래스는 net.kldp.jsd.SimpleDaemon 인터페이스를 구현해야 한다.
public void startDaemon() : 데몬작업을 수행하는 메소드. 여기에 실제 작업 구현이 들어간다.
public void shutdown() : 데몬이 종료하기 전에 수행할 작업을 기록한다.
net.kldp.jsd.SimpleDaemonManager의 객체를 생성하고, 객체에 데몬 클래스를 등록해 준다.
net.kldp.jsd.SimpleDaemonManager.start()를 실행하면 데몬이 시작된다.
net.kldp.jsd.SimpleDaemonManager.shutdownDaemon()를 실행하면 데몬을 종료시키는 파일이 $HOME 디렉토리에 생성되어, 데몬을 종료시키게 된다.

예제 보기
아래 예제는 대책없이 화면에 시간을 출력하는 데몬이다.


데몬의 시작 : java net.kldp.jsd.sample.ShowTime
데몬의 종료(다른 콘솔 창에서) : java net.kldp.jsd.sample.ShowTime -shutdown
여기서 데몬을 종료하기 전에 다시 한번 데몬을 시작해보면 락 파일이 존재하기 때문에 실행을 거부하는 것을 볼 수 있다.
/*
 * Created on 2004. 11. 6.

 */
package net.kldp.jsd.sample;

import java.io.IOException;
import java.util.Date;

import net.kldp.jsd.IllegalSimpleDaemonClassException;
import net.kldp.jsd.SimpleDaemon;
import net.kldp.jsd.SimpleDaemonManager;

/**
 * SampleDaemon 예제.
 *
 * 현재 시간을 계속해서 보여주는 데몬이다.
 *
 */
public class ShowTime implements SimpleDaemon {

  public static void main(String args[]) {
    // -shutdown 옵션이 있을 경우 데몬을 종료시킨다.
    if (args.length > 0 && args[0].equals("-shutdown")) {
      System.out.println("ShowTime 종료시작.");
     
      try {

        SimpleDaemonManager sdm = SimpleDaemonManager.getInstance(ShowTime.class);
        sdm.shutdownDaemon();
      } catch (IOException e1) {
        e1.printStackTrace();
      } catch (IllegalSimpleDaemonClassException e) {
        e.printStackTrace();
      }
      return; // 프로그램 종료.
    }

    SimpleDaemonManager sdm = null;
   
    try {
      sdm = SimpleDaemonManager.getInstance(ShowTime.class);
      sdm.start();
    }  catch (Exception e) {
      e.printStackTrace();
    }
  }
 
  /**
   * 데몬 작업수행 : 현재 시간을 계속 보여준다.
   */
  public void startDaemon() {
    while (true) {
      Date now = new Date();
      System.out.println(now.toString());
      try {
        Thread.sleep(5000);
      } catch (Exception ex) {
        ex.printStackTrace();
      }
    }
   
  }

  /**
   * ShowTime 종료시 실행할 내용들.
   */
  public void shutdown() {
    System.out.println("ShowTime을 종료합니다.");
  }
}

2008. 5. 10. 05:00

DB랑 연동을 하다보면 배열의 값을 한 문자로 만들어서 저장해야 하는 경우가 빈번하다.

배열의 인덱스가 100개면 배열의 값을 하나씩 필드 100개를 만들어 저장 할 수도 있지만
모두 미친짓이라고 할것이다.

그래서 대부분 하나의 문자열로 보내서 DB 필드에 저장하고,
다시 그 값을 받을 때 배열로 쪼개야 하기 때문에 중간에 보통 구분자를 넣어서 하나의문자열로 저장을 한다.

다음과 같이 하면
배열 dA는 원래 자기가 처음에 s배열에 저장 했던 내용을 그대로 dA배열에 저장 할 수 있다.

s = [];
s[9] = 9;
sA = s.join("(#)");

sA 로 보내고 아래처럼 받아서 사용한다.

dA = sA.split("(#)");


2008. 5. 10. 05:00

1. Cookie 개요

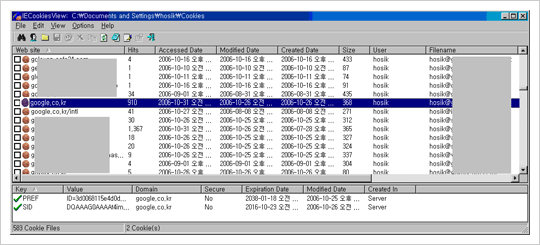
Cookie는 사용자가 방문한 웹 사이트에서 추후에 어떤 용도로든 사용하기 위해서 사용자의 하드디스크에 남기는 정보를 의미한다. 예를 들어 사용자가 특정 팝업창에 대해 "더 이상 띄우지 않음", "오늘은 띄우지 않음" 등과 같은 체크 박스를 선택할 경우 다음부터 해당 사이트에 방문할 때 더 이상 그런 팝업창이 나타나지 않게 되는데 이는 Cookie 정보가 사용자의 PC에 저장되어 있기 때문이다. 엄밀히 말하자면 이런 Cookie는 Persistent Cookie라고 불리우며 메모리 공간에 상주하여 브라우저 관련 프로세스가 실행되고 있을 때까지만 유효한 Cookie 정보도 있는데 이를 Non-Persistent Cookie 혹은 Session Cookie라고 부른다.


2. Cookie 종류


Cookie의 종류에는 Persistent Cookie와 Session Cookie(Non-Persistent Cookie)가 있다. 이 두 개를 비교하면 다음과 같다.


비교 항목

Persistent Cookie

Session Cookie

저장 위치

디스크매체(text 파일)

브라우저가 사용하는 메모리 공간

초기 접속 시 전송 여부

초기 접속 시 전송

서버로부터의 Set-Cookie로 할당되어야 메모리 공간에 나타나므로 초기 접속 시 전송되지 않음

Cookie의 만료 시기

Cookie 항목에 대해 설정된 expiration date가 지난 경우, 사용자가 Cookie를 삭제한 경우

사용자가 브라우저를 종료한 경우, 서버가 Set-Cookie Cookie 항목의 내용을 클리어한 경우

주요 용도

사용자가 사이트 재방문 시 속성 (팝업창 제한, ID, Password )을 기억하기 위함

사용자가 사이트 접속 시 인증 정보를 유지하기 위함


3. Cookie 동작 원리


클라이언트가 웹서버에 접속할 때 Cookie가 어떤 식으로 교환되는지 살펴보기로 하자.
우선 클라이언트가 해당 서버에 대한 Persistent Cookie를 저장하고 있다면 저장하고 있는 Cookie 정보가 만료되었는지 여부를 확인하여 만료되지 않았다면 해당 Cookie 정보를 보낸다. 이 정보는 Request Header에 포함되어 전달된다.


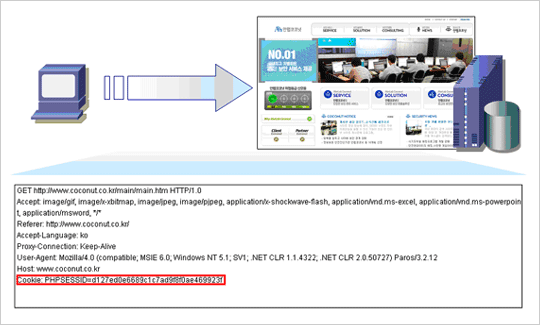
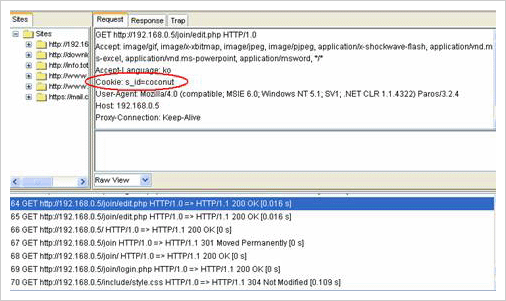
초기 접속시 Request Header에 포함된 Cookie 정보
 
서버는 클라이언트가 보낸 Cookie 정보를 해석한다. 또한 서버에서 클라이언트에 대해 추가적인 쿠키 정보를 셋팅할 필요가 있을 때는 응답 메시지에 Set-Cookie 정보로 보낸다.
 
 
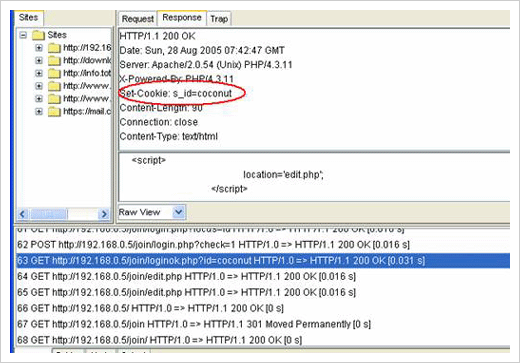
서버의 Response Header에 포함된 Set-Cookie


클라이언트는 해당 Cookie 정보를 받아들이거나 무시할 수 있지만 특별한 브라우저 설정을 하지 않았고 Set-Cookie가 규약을 만족한다면 받아들이는 것이 기본이다. 다음에 해당 웹서버로 클라이언트가 요청을 하게 될 경우 앞서 보냈던 쿠키 정보에 Set-Cookie에 의해 새로이 추가된 쿠키 정보를 포함하여 보낸다.


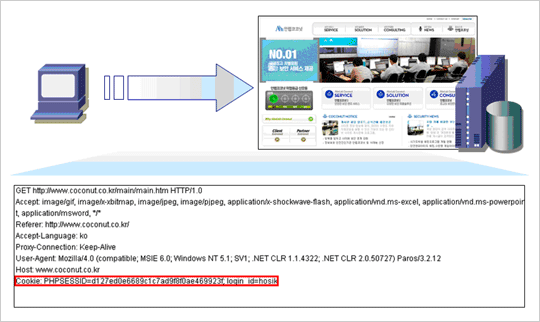
Set-Cookie 설정 이후 Request Header에 포함된 Cookie 정보


여기서 웹서버가 브라우저에 보내는 Set-Cookie를 좀 더 상세히 보자. Set-Cookie는 다음과 같은 정보가 포함될 수 있다.


필드

설명

NAME=VALUE

(Required) 쿠키 변수 이름과 쿠키 변수 값을 지정한다. 앞서 예제의 경우에는 login_id NAME, hosik VALUE가 된다.

Comment=Comment

(Optional) Cookie에는 개인 정보가 포함되는 경우가 있다. 따라서 해당 Cookie가 어떤 용도로 사용되는 Cookie인지 사용자에게 알리기 위한 용도로 Comment를 추가한다. 사용자는 Comment 정보로 판단하여 해당 Cookie를 허용할지 않을지 여부를 결정할 수 있다.

Domain=Domain

(Optional) Cookie 정보가 유효한 도메인을 말한다. 어떤 사이트의 경우에는 하나의 인증 받은 정보를 다른 URL에서도 사용해야 하는 경우가 있다. 예를 들어 www.coconut.co.kr을 통해 인증 받았지만 file.coconut.co.kr이라는 URL에도 같은 정보가 유지되어야 하는 경우이다. 이런 경우 Domain=.coconut.co.kr이라는 정보를 추가로 쓰게 되며 Domain 값으로는 반드시 \'.\' 문자가 선행되어야 한다. (ex. Domain=file.coconut.co.kr (X), Domain=.coconut.co.kr (O))

Path=path

(Optional) 어떤 경로에 해당 Cookie가 적용될지를 의미한다. Path=/ 라고 한다면 모든 경로에 적용되며 Path=/download/ 라고 한다면 /download/ 이하의 경로에 적용된다.

Max-Age=delta-seconds

(Optional) Cookie lifetime을 의미하며 delta-seconds가 경과하면 클라이언트는 Cookie를 버려야 한다. 해당 값은 0 이상으로 셋팅될 수 있으며 0으로 셋팅된 것은 해당 쿠키값이 바로 버려져야 한다는 것을 의미한다.

Secure

(Optional) 해당 Cookie secure channel로 전송되어야만 함을 의미한다.

Version=Version

(Required ) Version 10진수의 정수로 표현될 수 있다. Cookie의 버전을 의미하며 Version=1로 표현된다.


브라우저에 전송된 Set-Cookie가 악의적인 경우에 대처하기 위해 브라우저는 다음과 같은 경우 쿠키 정보를 거부할 수 있다.

- Domain 값이 \'.\'으로 시작되지 않는 경우
- 요청한 호스트 정보와 Domain의 값이 무관한 경우
- 요청한 호스트가 FQDN(IP 주소 형태가 아님)의 형태를 가질 때 요청한 호스트의 FQDN에서 Domain 값을 제외한 나머지, 즉 호스트명이 \'.\'을 하나 이상 포함하는 경우

(예를 들면 다음과 같음)
청한 호스트의 FQDN이 www.coconut.co.kr인데 Domain 값이 .co.kr 혹은 .kr인 경우


4. Cookie 파일 저장 위치 및 구조


Cookie(엄밀히 Persistent Cookie) 파일이 저장되는 위치, 그리고 저장 방식은 웹 브라우저 종류와 버전에 따라 상이하다. 예를 들어 Netscape Navigator 4.x 버전은 User Preference 폴더에 cookies.txt라는 파일 하나로 저장하였으며 Opera 4.x 버전은 cookies4.dat라는 파일로서 Opera 디렉토리에 저장한다. 국내에서 가장 많은 유저가 사용하는 인터넷익스플로러의 경우는 도메인마다 파일 하나로서 저장한다. 또한 저장되는 위치는 Windows 버전에 따라 다를 수 있다. 따라서 Cookie 파일을 찾기 위해서는 \'파일 찾기\'등의 검색 툴을 이용하여 검색어로서 \'Cookie\'를 입력하여 로컬하드디스크를 확인해보는 것이 쉽다.

이중 윈도우에 저장된 인터넷익스플로러의 Cookie 파일의 예를 보자. 다음은 로컬하드디스크에저장된 hosik@google[1].txt의 내용을 메모장으로 열어 본 경우이다.


PREF
ID=e86917dffe2b57c6:TB=2:TM=1154070164:LM=1161827593:DV=AA:S=R4sPp
GRTj7axz2nH
google.com/
1536
2618878336
32111634
2149319072
29816993
*


여기서 PREF는 Cookie의 Name이며 , ID=e86917dffe2b57c6.. (생략) .. S=R4sPpGRTj7axz2nH 는 Cookie의 Value, google.com/는 Cookie가 사용되는 Domain과 Path를 의미하며 1536은 해당 Cookie가 Secure하지 않음을 의미한다. 이렇게 Cookie 파일 그 자체로서 내용을 분석하는 것은 까다로운 문제이다. IECookieView라는 툴을 이용하면 다음과 같이 저장된 Cookie 내용들을 쉽게 열람하고 분석할 수 있다.


IECookieView를 이용한 Cookie 정보 열람
 

5. Cookie 취약점
 
우선 기억해야 할 점은 대부분의 Cookie를 이용한 공격은 서버 수준에서 직접 침해를 일으키기 위한 공격은 아니며 해당 서버를 이용하는 일반 사용자를 대상으로 한다는 점이다. 물론 이런 침해로 인한 사용자 피해 사례가 발생할 경우 해당 서버를 운영하는 기업에 대해 보안이 취약하다는 인식으로 신뢰성은 떨어지게 되는 간접적으로 피해가 될 수는 있다.
 
Cookie Theft
 
Cookie Theft는 제목 그대로 Cookie를 얻어 내는 방법이다. 얻어낸 Cookie 정보가 유용할지 그렇지 않을지는 Cookie를 구현하고 있는 사이트의 Cookie 구현 방식에 따라 다르다. 얻어낸 Cookie 정보가 전혀 유용하지 않은 경우가 있는가 하면 어떤 경우에는 실명, 주민등록번호 쌍과 같은 크리티컬한 개인 정보를 유출하는 경우도 존재한다. 어떤 식으로 이런 Cookie를 얻어낼 수 있는지 알아 보자.
 
5.1 지정된 파일 이용
 

Persistent Cookie의 경우에는 사용자의 하드디스크에 저장된다. 특히 PC방이나 전산실, 도서관 등과 같은 공용 PC 환경에 저장된 하드디스크에 저장된 Cookie 정보는 쉽게 얻어낼 수 있다. 앞서 언급한 IECookieView 등을 통하여 종종 사용자의 ID, 비밀번호를 얻어내는 그런 직접적인 시도가 아니더라도 사용자의 ID, 비밀번호가 암호화된 형태로 저장되어 있을 때 해당 Cookie 값을 그대로 복사해와서 ID, 비밀번호 인증 절차를 거치지 않고 로그인할 수 있다. 이 경우는 자동로그인을 활성화한 거의 모든 사이트의 경우 ID, 비밀번호와 같은 중요 인증 정보를 Persistent Cookie로서 저장하기에 발생하는 문제이다.


5.1.1 XSS, XST 등의 취약점을 이용


XSS는 Cross Site Scripting의 약자로 CSS로 표기되지 않는 이유는 Cascading Style Sheet와 그 약자가 동일하기 때문에 혼동이 될 수 있어서이다. XST는 HTTP 메소드 중 디버깅을 위한 용도의 TRACE라는 메소드를 이용하는 것으로 Cross Site Tracing으로 XSS에 비해 진보된 공격 기법이다. XSS를 통한 Cookie Theft는 Cookie 옵션을 이용하여 근본적인 차단 방법이 있기에 이런 방법을 구현한 사이트에 대해서는 XST 기법을 사용한다. XSS, XST를 이용하는 경우에는 브라우저 프로세스 실행 중에만 유지되는 Session Cookie와 같은 정보도 얻어낼 수 있다.


○ XSS 취약성을 이용
 

XSS 취약성은 클라이언트 레벨에서 의도치 않은 스크립트(자바스크립트)가 실행되도록 하는 것이다. XSS 취약성을 응용한 공격 형태를 몇 가지 제시하면 다음과 같다.


ㅈ- 게시판에 HTML 태그(<script> 등)를 포함하는 방법
- Flash의 ActionScript를 이용하는 방법
- 웹 서버 취약성을 이용하여 URL에 HTML 태그 추가
`` http://www.victim.com/<script>alert(document.cookie)</script>
- 웹 어플리케이션의 취약성을 이용하여 파라미터에 HTML 태그 추가
```http://www.victim.com/hole.asp?q=<script>alert(document.cookie)</script>


아래 그림은 XSS 취약성을 이용한 일례이다. 게시판에 악성 스크립트를 포함하여 사용자가 원하지 않는 대화상자가 계속하여 나타나도록 만든 것이다.


XSS 취약성을 이용한 악성 스크립트 실행


이번에는 XSS 취약성을 이용하여 사용자의 Cookie 정보를 얻어내려는 시도를 해보겠다. 다음과 같이 그림 파일을 하나 포함하여 마우스커서를 그림파일 위로 이동하면 get_cookie.php가 실행되어 Cookie 정보를 저장하도록 한다.


XSS 취약성을 이용한 Cookie Theft 시도


위의 예시에서는 게시판을 포함한 사이트와 공격을 위한 이미지 파일과 get_cookie.php 파일이 동일한 사이트인 192.168.152.20에 저장되고 있지만 실제 공격 시에는 공격을 위한 이미지 파일과 get_cookie.php는 공격자가 Cookie 정보를 저장하고자 하는 사이트에 웹 사이트를 구성하여 저장한다.


get_cookie.php의 내용은 유포시 공격에 사용될 위험이 있음으로 생략 하도록 하겠다. 어느 정도의 웹 프로그래밍 지식이 있다면 개별적으로 구현을 해 보는 것도 좋을 것 같다.


저자가 구현해 놓은 get_cookie.php파일 내용에는 사용자의 IP 주소, Cookie가 노출된 시간, 노출된 Cookie 정보를 getcook.txt 파일로서 저장한다. 이제 일반 사용자가 해당 게시물의 그림을 보는 순간 다음과 같은 해당 사용자의 Cookie 내용이 공격자가 만들어둔 사이트의 getcook.txt 파일로서 저장된다.


Cookie Theft 결과 얻어낸 Cookie


○ XST 취약성을 이용


XSS 취약성을 이용한 Cookie Theft는 매우 위협적이다. 이 방법을 근본적으로 차단할 수 있도록 하기 위한 메커니즘이 있는데 이는 다음달 연재에서 자세히 다루겠다. 이런 메커니즘이 적용된 Cookie의 경우에는 XSS 취약성으로 얻어낼 수 없다. 이 경우 사용하는 것이 TRACE 메소드를 이용한 XST(Cross Site Tracing)이다. 이 공격 기법에 대한 상세한 내용은 언급하지 않겠다.


5.1.2 스니핑 기법을 이용


Cookie는 패킷 스니핑을 통하여 요청에 포함된 Cookie 헤더 필드를 통해서도 얻어낼 수 있다. 유선랜 환경과 무선랜 환경의 경우로 나누어 알아 본다.


○ Wired LAN


다음은 Ethereal을 통하여 실제로 특정 사이트에 대한 접속 시 Cookie 정보를 얻어낸 화면이다.


Ethereal을 통한 Cookie Theft


패킷 스니핑까지 할 수 있는 환경이라면 아예 Cookie 대신 로그인 시 전송되는 ID, Password 정보를 얻는 것이 더 현명할 수도 있겠다고 판단할 수 있다. 맞는 말이지만 로그인 과정이 SSL 등으로 암호화하여 전송되어 ID, Password를 얻을 수 없는 경우에 얻어낸 Cookie 정보는 매우 도움이 된다. 물론 접속 이후에도 모든 통신 과정이 SSL로 암호화되어 이루어진다면 스니핑으로도 Cookie 정보는 얻어낼 수 없지만 보안 수준이 매우 높지 않은 대부분의 사이트(즉 금융권 등을 제외한 사이트)는 로그인 과정에 전달되는 ID, Password 정도만 SSL 암호화를 적용하고 있음을 기억하자. 물론 심지어는 그런 최소한의 암호화도 안하고 있는 사이트도 많다.


두 번째로 의문을 가질 수 있는 점은 패킷 스니핑이 그렇게 쉬운가 하는 점이다. 유선랜 환경에서는 허브 환경이라 사용자의 모든 트래픽을 복사하여 아무 포트에서나 쉽게 다른 사용자의 트래픽을 볼 수 있는 방법, 혹은 스위치 환경이나 스위치를 제어할 수 있어서 특정 포트를 mirroring 포트로 지정하여 보는 방법이 있을 수 있다. 물론 이것도 저것도 아니면 ARP Redirect 등과 같은 기법을 쓸 수도 있으나 이러한 방법들은 최소한 중요한 정보를 얻고자하는 네트워크 내에 공격자가 포함되어 있어야 한다.


○ Wireless LAN


무선랜 환경에서는 스니핑을 통해 중요한 정보를 얻는 것이 매우 쉬워졌다. 무선랜 환경에서 패킷의 송수신은 안테나를 통해 전파를 수신하여 모든 사람이 라디오를 청취하는 것과 같아서 주파수만 맞추면 누구나 그 패킷을 수신할 수 있다. 그리고 그 주파수란 몇 개 되지 않는 값으로 그것을 맞추는 일은 아주 쉽다. 이러한 공격 기법에 대한 대응책으로서 보안 의식이 있는 네트워크 관리자는 자사가 보유한 AP(Access Point) 장비에 WEP, WPA 등과 같은 암호화를 적용하기도 하지만 아직도 단지 MAC 주소 인증만으로 어느 정도의 보안 조치를 끝냈다고 생각하는 관리자는 너무도 많다.


다음 그림은 AiroPeek를 통한 스니핑 결과 화면이다.


 AiroPeek 를 통한 스니핑

스니핑을 통한 Cooke 정보 획득


5.2 Cookie 정보 활용


여기까지 HTTP Session으로 이용되는 Cookie 값들을 수집하는 방법등을 알아 보았다. 그러면 이러한 방법들을 이용하여 Cookie를 수집하는 이유는 무엇일까?


5.2.1 개인정보 유출


저자는 지금 이 글을 읽고 있는 여러분이 직접 개인이 가입된 웹 사이트에 가서 Cookie값을 확인 해 봤으면 한다


가입된 웹 사이트에 로그인을 한 후 아래 그림과 같이 주소입력 창에
javascript:document.cookie 를 입력하면 개인의 Cookie 값을 확인 해 볼 수 있다.


저자가 가입된 웹 사이트 쿠키값


여러분들은 어떻게 결과 값이 나타나고 있는가?


저자의 쿠키값에는 계정과 이름 그리고 메일주소가 설정되어 있어, 누군가가 이 정보를 가지고 가면 저자의 정보들을 획득 할 수 있을 것이다. 만일, 이 쿠키값에 위 정보외에 주민 번호, 주소, 전화번호, 핸드폰번호등이 있다고 가정하면 자기 자신의 모든 개인정보들이 나도 모르게 외부에 알려지게 된다. 그 예로 2004년 1사분기 Cookie에 포함된 개인정보가 유출된 사례로서 많은 사이트가 주민등록번호, 실명 정보 등을 쿠키에 포함하여 노출한 사례가 발견된 바 있었다.


기사 제목

대검 등 주요 사이트 개인정보 무방비 노출 (2004-02-24, 연합뉴스)

기사 내용 (일부)

국가 최고 수사기관, 공중파 방송사, 유명 신문사, 1천만명이 넘는 회원을 가진 커뮤니티 등 주요 웹사이트 상당수가 암호화 미비로 개인정보를 고스란히 노출, 타인 명의를 도용한 불법선거운동, 허위 투서, 명예훼손, 사기 등에 악용될 우려가 매우 높은 것으로 나타났다.

24일 네트워크와 보안업계에 따르면 주요 웹사이트 상당수가 서버와 PC 사이의 로그인과 접속유지를 위해 반복 교환하는 쿠키(cookieㆍ용어설명 참조)에 주민등록 번호, 실명, 실제 주소, e-메일 주소, 전화번호, 연령, 성별 등의 정보를 암호화되지 않은 평문으로 담는 방식을 사용, 이같은 문제점이 빚어지고 있다.
……(이하 생략) ……


5.3 사용자 도용(Cookie Spoofing)

매번 사용자가 로그인할 때마다 랜덤한 값으로 생성되는 일회용 토큰 형태의 Cookie 값을 이용한 인증을 하지 않는 사이트의 경우, 얻어낸 타 사용자의 Cookie 정보를 이용하여 다른 사용자로 로그인할 수 있다. Cookie를 위조하는 공격 기법이라고 하여 이를 Cookie Spoofing이라고 한다. Cookie Spoofing에는 도용하고자 하는 대상 사용자(희생자)의 Cookie 정보가 필요하지 않은 경우와 Cookie 정보가 필요한 경우가 있는데 전자와 후자를 각각 ‘단순 사용자 도용’, ‘Cookie Theft와 연계한 사용자 도용’으로 나누어 설명하도록 한다. 그 전에 잠시 ParosProxy 툴에 대해 알아보자.


5.3.1 ParosProxy의 소개


Cookie를 조작하기 위해서는 클라이언트가 서버에 Cookie 헤더를 보내는 중간에, 혹은 서버가 클라이언트에게 Set-Cookie 헤더를 보내는 중간에 요청과 응답을 가로채어 수정해야 한다. 물론 브라우저 자체가 그런 기능을 제공하는 경우도 있지만(일례로 FireFox의 플러그인 TamperData가 있음) Proxy 계열의 점검 도구를 사용하는 것이 편리하다. 이런 툴의 경우 또 다른 Proxy Server를 다시 Proxy Server로 잡는 Proxy Chain 기능, Request, Response에 대한 저장 및 분석, Web Spidering(Crawling), 또한 SQL Injection, CRLF Injection 등의 보안 취약성 검사 기능 등의 유용한 기능을 제공하기 때문이다. 그러한 툴 중에 프리웨어로서 유명한 툴이 ParosProxy이다. 이 툴은 http://www.parosproxy.org/에서 다운로드할 수 있으며 설치 과정은 단순하므로 생략한다. 툴 설치 이전에 JRE(Java Runtime Environment)가 설치되어 있어야 하며 버전은 ParosProxy에서 요구하는 버전으로 설치하여야 한다.


ParosProxy 툴 설정이 끝난 이후, www.coconut.co.kr 사이트에 접속한 이후 ParosProxy에서볼 수 있는 결과 화면이다. 다음과 같이 요청과 응답의 내용을 헤더를 포함하여 상세히 볼 수 있다.


ParosProxy Example


5.3.2 단순 사용자 도용


이 장에서 공격 기법을 설명하기 위해 구현된 사이트는 다음과 같다. ID, Password 정보를 입력하면 로그인할 수 있는 사이트로 Cookie Spoofing을 이용한 사용자 도용을 설명하기 위해 임의로 구현한 사이트이다. 하지만 현재 실환경으로 운영되는 많은 사이트도 이런 문제점을 갖고 있음을 간과하지 말아야 한다.


로그인 시도 화면


위 사이트는 일반적인 로그인 페이지다. 로그인할 경우 다음과 같이 해당 회원에 대한 정보를 열람하는 페이지가 확인된다.


로그인 성공 결과


물론 ID, Password를 잘못 입력하면 다음과 같은 오류 화면이 나타나는 일반적인 로그인 페이지이다.


로그인 실패 결과


로그인한 이후 회원정보변경 페이지가 열릴 때의 요청을 ParosProxy를 통해 확인해 보면 아래와 같이 s_id라는 Cookie 값이 ‘coconut’으로 셋팅되었음을 알 수 있다.


로그인 성공 이후 확인된 Cookie Header


이 Cookie 정보를 토대로 사용자의 인증 정보를 유지하며 또한 사용자가 coconut임을 구분하는 것으로 유추할 수 있다. 그렇다면 이것을 다른 값으로 바꾼다면 어떤 현상이 나타날 수 있을까? 그 이전에 로그인 과정에서 앞서 이야기한 Set-Cookie라는 Response Header가 확인되는지를 보자.


로그인 성공 시 확인된 Set-Cookie 정보


ParosProxy에 저장된 요청과 응답 내용을 보니 Set-Cookie라는 헤더가 나타나는 것을 볼 수 있다. 그렇다면 이 Set-Cookie 값을 중간에 가로채서 다른 값으로 변경해버리면 클라이언트가 이후에 보내게 될 Cookie 값도 다른 값으로 보내지게 될 것이다. 정말 그런지 확인해 보자.


ParosProxy를 이용할 경우 Set-Cookie 값을 중간에 가로채어 조작하는 방법은 크게 두 가지가 있다. 우선 Trap 기능을 이용하는 것이다. Trap 기능은 다음과 같이 활성화할 수 있다. Trap request를 선택하게 되면 클라이언트에서 서버 측으로 보내지는 데이터를 중간에 가로채어 조작하도록 할 것이며 Trap response를 선택하게 되면 서버 측에서 클라이언트로 보내지는 데이터를 중간에 가로채어 조작하도록 할 것이다.


Trap response 설정


두 번째 방법은 Tools > Filter 메뉴에서 Detect and alert ’Set-cookie’ attempt in HTTP response for modification을 활성화 하는 것이다.


Set-cookie 시도 탐지 설정


두 번째 방법으로 할 경우 모든 응답 메시지를 가로채지 않고 Set-cookie 헤더가 나타났을 때만 가로채어 조작할 수 있도록 한다. 두 가지 중 어느 방법이든 가능하니 편한 방법을 쓰면 된다. 여기서는 Trap을 이용한 방법으로 기술하겠다.


우선 앞서 제시된 것과 같이 Trap Response 항목을 체크한다. Set-Cookie의 경우는 서버가 클라이언트에게 보내는 데이터를 조작하는 것이므로 Trap Response를 하는 것으로 충분하다.


Trap response를 셋팅한 상태에서 다시 로그인을 시도해본다. 요청에 대하여 응답을 계속 중간에 가로채어 보여줄텐데 Continue 버튼을 클릭하면 다음 단계로 넘어간다. 다음과 같이 Set-Cookie 화면이 나타날 때까지 넘어간다.


Trap 기능을 이용한 Set-Cookie 정보 변경 시도


여기서 Continue를 누르기 전에 Set-Cookie의 내용을 다음과 같이 조작한다.


Trap 기능을 이용한 Set-Cookie 정보 변경 시도


이제 Continue를 누른다. 그 전에 더 이상의 response를 중간에 가로챌 이유는 없으므로 Trap response 체크박스는 해제해도 좋다. 그 결과 다음과 같이 ahncoco 계정의 패스워드 정보를 입력하지도 않았고 알지도 못함에도 ahncoco로서 로그인 성공하였음을 알 수 있다.


사용자 도용 성공 결과


이 예제에서는 이해를 돕게 하기 위하여 상황을 최대한 단순화시켰다. 하지만 s_id라는 ID 이름 대신 숫자로 표현된 값으로 사용자를 구분하는 경우도 실제로 구현된 사이트 중에 있다. 즉 hosik은 12341, ahncoco는 12342라고 표현되었다고 하자. 이 경우 Cookie 값을 12342로 변경하면 ahncoco로 로그인된다. 또한 이런 경우 주요 계정이 초기에 생성되었음을 감안하여 낮은 숫자로 시도함으로 종종 admin 계정과 같은 경우로 로그인 성공하는 경우도 있다.


5.3.3 Cookie Theft와 연계한 사용자 도용


Cookie Theft를 통해 Cookie 정보를 얻어내어야 하는 경우가 있다. 인증에 사용되는 Cookie 정보가 앞선 경우와는 달리 복잡하게 설정된 경우이다. 대표적인 경우는 아래와 같은 경우이다. 아래 정보를 보면 사용자ID, 해당 부서 등의 정보를 얻어내야 할텐데 앞서 논한 단순 사용자 도용과 같이 추측만으로 하기는 어려운 문제이다. 이 경우는 사용자의 Cookie를 얻어내는 방법 즉 Cookie Theft가 필요하다. 하나, 이 경우도 기억할 점이 있다면 Cookie 정보는 많지만 실제 로그인 정보를 유지하고 사용자 정보를 구분하는 핵심 Cookie 정보만 필요하다는 점이다. 그런 정보가 많지 않고 간단하게 구현되어 있다면 그것을 파악하면 좀 더 쉽게 작업을 할 수 있다.


ASPSESSIONIDCARTBSDR=CCNGEOOABFJGIHHCJIIEPFBP; LoginInfo=Key=79%1683%1667%1668%1660%1677%16&EditorMode=1&HOST=coconut%2Eonnet21%2Ecom&SvcOrder=5%2CB05%2C0%2C0%2C10%2CB10%2C0%2C0%2C12%2CC02%2C0%2C0%2C14%2CC04%2C0%2C0%2C17%2CC08%2C1%2C1%2C11%2CC01%2C1%2C1%2C7%2CB07%2C1%2C1%2C8%2CB08%2C1%2C1%2C3%2CB03%2C1%2C1%2C2%2CB02%2C1%2C1%2C13%2CC03%2C1%2C1%2C4%2CB04%2C1%2C1%2C9%2CB09%2C1%2C1%2C1%2CB01%2C1%2C0%2C6%2CB06%2C1%2C0%2C&MailHost=mail&EmpID=54&UserID=hosik&PosName=+%B4%EB%B8%AE&ComName=%28%C1%D6%29%BE%C8%B7%A6%C4%DA%C4%DA%B3%D3&bbp=YldWc2IyNW5JUT09&DOMAIN=coconut%2Eonnet21%2Ecom&ComID=COCONUT&DeptName=%BA%B8%BE%C8%B1%E2%BC%FA%BF%AC%B1%B8%C6%C0&UType=N&UpperDepts=i%5FDeptId%3D26+OR+i%5FDeptId%3D22+OR+i%5FDeptId%3D0&fmode=1&Name=%C0%CC%BF%EB%C7%D0&DeptID=26&ID=hosik


얻어낸 Cookie를 재사용하여 로그인할 수 있는 문제점, 공격 기법을 Cookie Replay라고 부른다.

2008. 5. 10. 05:00

test
test


HTML>
<HEAD>
<TITLE>자바 스크립트 쿠키 셋팅, 추출, 삭제 예제</TITLE>
<STYLE type="text/css">
table{ font-size:9pt; }
</STYLE>
<SCRIPT>
/**
* 쿠키값 추출
* @param cookieName 쿠키명
*/
function getCookie( cookieName )
{
    var search = cookieName + "=";
    var cookie = document.cookie;

    // 현재 쿠키가 존재할 경우
    if( cookie.length > 0 )
    {
        // 해당 쿠키명이 존재하는지 검색한 후 존재하면 위치를 리턴.
        startIndex = cookie.indexOf( cookieName );

        // 만약 존재한다면
        if( startIndex != -1 )
        {
            // 값을 얻어내기 위해 시작 인덱스 조절
            startIndex += cookieName.length;

            // 값을 얻어내기 위해 종료 인덱스 추출
            endIndex = cookie.indexOf( ";", startIndex );

            // 만약 종료 인덱스를 못찾게 되면 쿠키 전체길이로 설정
            if( endIndex == -1) endIndex = cookie.length;

            // 쿠키값을 추출하여 리턴
            return unescape( cookie.substring( startIndex + 1, endIndex ) );
        }
        else
        {
            // 쿠키 내에 해당 쿠키가 존재하지 않을 경우
            return false;
        }
    }
    else
    {
        // 쿠키 자체가 없을 경우
        return false;
    }
}

/**
* 쿠키 설정
* @param cookieName 쿠키명
* @param cookieValue 쿠키값
* @param expireDay 쿠키 유효날짜
*/
function setCookie( cookieName, cookieValue, expireDate )
{
    var today = new Date();
    today.setDate( today.getDate() + parseInt( expireDate ) );
    document.cookie = cookieName + "=" + escape( cookieValue ) + "; path=/; expires=" + today.toGMTString() + ";"
}

/**
* 쿠키 삭제
* @param cookieName 삭제할 쿠키명
*/
function deleteCookie( cookieName )
{
    var expireDate = new Date();

    //어제 날짜를 쿠키 소멸 날짜로 설정한다.
    expireDate.setDate( expireDate.getDate() - 1 );
    document.cookie = cookieName + "= " + "; expires=" + expireDate.toGMTString() + "; path=/";
}

/**
* 자신이 지정한 값으로 쿠키 설정
*/
function setMyCookie()
{
    setCookie( form.setName.value, form.setValue.value, form.expire.value );
    viewCookie(); // 전체 쿠키 출력 갱신
}

/**
* 자신이 지정한 쿠키명으로 확인
*/
function getMyCookie()
{
    alert( "쿠키 값 : " + getCookie( form.getName.value ) );
}

/**
* 자신이 지정한 쿠키명으로 쿠키 삭제
*/
function deleteMyCookie()
{
    deleteCookie( form.deleteName.value );
    alert("쿠키가 삭제되었습니다.");
    viewCookie();
}

/**
* 전체 쿠키 출력
*/
function viewCookie()
{
    if( document.cookie.length > 0 )
        cookieOut.innerText = document.cookie;
    else
        cookieOut.innerText = "저장된 쿠키가 없습니다.";
}
</SCRIPT>
</HEAD>


<body onLoad = "viewCookie()">
<form name = "form">
    <table cellpadding = "0" cellspacing = "0">
    <tr>
        <td bgcolor = "#666666">
        <table cellpadding = "0" cellspacing = "1">
        <tr height = "25">
            <td align = "center"><font color = "#ffffff">쿠키 설정</font></td>
            </tr>
            <tr>
            <td bgcolor = "#ffffff" align = "center">
            쿠키명 : <input type = "text" name = "setName"><br>
            쿠키값 : <input type = "text" name = "setValue"><br>
            기한 : <input type = "text" name = "expire"><br>
            <input type = "button" onClick = "setMyCookie()" value = "쿠키설정">
            </td>
        </tr>
        </table>
        </td>
    </tr>
    </table>

    <br>
    <table cellpadding = "0" cellspacing = "0">
    <tr>
        <td bgcolor = "#666666">
        <table cellpadding = "0" cellspacing = "1">
        <tr height = "25">
            <td align = "center"><font color = "#ffffff">쿠키 확인</font></td>
            </tr>
            <tr>
            <td bgcolor = "#ffffff" align = "center">
            쿠키명 : <input type = "text" name = "getName"><br>
            <input type = "button" onClick = "getMyCookie()" value = "쿠키확인">
            </td>
        </tr>
        </table>
        </td>
    </tr>
    </table>

    <br>
    <table cellpadding = "0" cellspacing = "0">
    <tr>
        <td bgcolor = "#666666">
        <table cellpadding = "0" cellspacing = "1">
        <tr height = "25">
        <td align = "center"><font color = "#ffffff">쿠키 삭제</font></td>
        </tr>
        <tr>
        <td bgcolor = "#ffffff" align = "center">
        쿠키명 : <input type = "text" name = "deleteName"><br>
        <input type = "button" onClick = "deleteMyCookie()" value = "쿠키삭제">
        </td>
        </tr>
        </table>
        </td>
    </tr>
    </table>

    <br>
    <table cellpadding = "0" cellspacing = "0">
    <tr>
        <td bgcolor = "#666666">
        <table cellpadding = "0" cellspacing = "1">
            <tr height = "25">
            <td align = "center"><font color = "#ffffff">전체 쿠키</font></td>
            </tr>
            <tr height = "25">
            <td bgcolor = "#ffffff" align = "center">
            <div id = "cookieOut"></div>
            </td>
            </tr>
        </table>
        </td>
    </tr>
    </table>
</form>
</body>
</html>


tes
test


1
1
1
11
1

test

2008. 5. 8. 05:00
목차 Table of Contents

소개 Introduction
데이타베이스 커넥션풀(DBCP) 설정 Database Connection Pool (DBCP) Configurations
Tyrex 커넥션 풀 Tyrex Connection Pool
DBCP를 사용하지 않는 방법들 Non DBCP Solutions
OCI 클라이언트로 Oracle8i 연결 Oracle 8i with OCI client
일반적으로 일어날 수 있는 문제 Common Problems

소개 Introduction

JNDI Datasource 설정은 JNDI-Resources-HOWTO에 상세하게 나와있지만 tomcat-user메일링리스트에서 보면 각각의 설정이 다소 까다롭다고 합니다.

많이 쓰이는 데이타베이스에 대하여 tomcat-user 메일링리스트에 올려진 몇개의 설정 예제가 여기 있습니다.

이들 간단한 메모들은 mysql 설정과 tomcat-user메일링리스트의 피드백에서 나온 것임을 알아야 합니다. 상황에 따라 다릅니다. 만일 좀 더 많은 사람에게 도움이 될 만한 테스트해본 설정이 있거나 어쨌건 이 섹션에 좋은 내용이 될 만한 것이라면 알려주십시오.

데이타베이스 커넥션풀(DBCP) 설정 Database Connection Pool (DBCP) Configurations

DBCP는 JDBC 2.0을 지원합니다. JVM 1.4를 사용하는 시스템에서는 DBCP는 JDBC 3.0을 지원할 것입니다. JVM 1.4에서 DBCP와 JDBC 3.0의 특징을 사용해보았으면 알려주십시오.

설정매개변수 모두를 보려면 DBCP Javadocs에서 BasicDataSource 클래스를 보십시오.

설치

DBCP는 Jakarta-Commons 데이타베이스 커넥션 풀을 사용하는데 그것은 여러개의 Jakarta-Commons 컴포넌트들에 의존합니다.

  • Jakarta-Commons DBCP 1.0
  • Jakarta-Commons Collections 2.0
  • Jakarta-Commons Pool 1.0
이 jar 파일들은 JDBC 드라이버 jar 파일과 함께 $CATALINA_HOME/common/lib에 설치하여야 합니다.
주의:써드 파티 드라이버는 zip 파일이 아닌 jar 파일이어야 하며 Tomcat은 $CATALINA_HOME/common/lib/*.jar만을 클래스패스에 추가합니다.
주의: 이 jar 파일들을 WEB-INF/lib, $JAVA_HOME/jre/lib/ext나 다른 곳에 설치하지 마십시오. $CATALINA_HOME/common/lib 외에 다른 위치에 설치했을때 문제가 생길 수 있습니다.
데이타베이스 커넥션 풀이 새는 것을 막는 방법

데이타베이스 커넥션 풀은 데이타베스의 커넥션들의 풀을 만들고 관리합니다. 이미 있는 커넥션을 재생하여 재사용하는 것은 새 커넥션을 가져오는 것보다 효율적입니다.

커넥션 풀링에는 한가지 문제가 있습니다. 웹 애플리케이션은 명시적으로 ResultSet, Statement, Connection을 닫아야 합니다. 웹 애플리케이션에서 이들 자원들을 닫지 못하게 되면 다시 재사용할 수가 없으며 데이타베이스 커넥션 풀 "구멍"이 생깁니다. 이것은 결국 웹 애플리케이션에서 더 이상 쓸 수 있는 데이타베이스 커넥션이 없을 때 커넥션 에러를 내게 될 것입니다.

이에 대한 해결책이 있습니다. Jakarta-Commons DBCP는 이렇게 버려진 커넥션을 추척하고 복구하도록 설정할 수 있습니다. 복구할 뿐만 아니라 이들 자원들을 열고서는 닫지 않았던 코드를 찾아 추적 결과를 만들어내기도 합니다.

버려진 커넥션이 제거되고 재생되도록 DBCP DataSource를 설정하기 위해 DBCP DataSource ResourceResourceParams에 아래 매개변수를 추가하면 됩니다. :

            <parameter>
              <name>removeAbandoned</name>
              <value>true</value>
            </parameter>
사용할 수 있는 커넥션이 부족해진다면 DBCP는 버려진 커넥션을 찾아 복구하고 재생합니다. 디폴트는 false로 되어 있습니다.

커넥션이 버려졌다고 간주되기 전에 사용되지 않은 시간(초)를 설정하기 위해 removeAbandonedTimeout를 설정하십시오.

            <parameter>
              <name>removeAbandonedTimeout</name>
              <value>60</value>
            </parameter>
버려진 커넥션을 제거하는데 기본적으로 정해진 타임아웃 시간은 300초입니다.

만일 커넥션 자원을 낭비한 코드 위치의 로그를 남기려고 한다면 logAbandoned 패러미터를 true로 할 수 있습니다.

            <parameter>
              <name>logAbandoned</name>
              <value>true</value>
            </parameter>
기본은 false로 되어 있습니다.
MySQL DBCP 사용예

0. 소개

MySQL과 mm.mysql JDBC 드라이버가 잘 연동된다고 보고된 버전은 다음과 같습니다.

  • MySQL 3.23.47, MySQL 3.23.47 using InnoDB, MySQL 4.0.1alpha
  • mm.mysql 2.0.14 (JDBC Driver)
새로 MySQL mm.mysql 3.0 driver를 테스트해봤다면 알려주시기 바랍니다.

1. MySQL 설정

달리하면 문제를 일으킬 수도 있으므로 이 지시를 반드시 따르십시오.

test 유저, 새 데이타베이스, 테스트 테이블 하나를 만드십시오. mySQL 유저는 할당된 패스워드가 있어야합니다. 비어있는 패스워드를 가지고서는 드라이버가 연결에 실패할 것입니다.

mysql> GRANT ALL PRIVILEGES ON *.* TO javauser@localhost 
    ->   IDENTIFIED BY 'javadude' WITH GRANT OPTION;
mysql> create database javatest;
mysql> use javatest;
mysql> create table testdata (
    ->   id int not null auto_increment primary key,
    ->   foo varchar(25), 
    ->   bar int);
주의: 위의 유저는 테스트가 끝나면 제거되어야 합니다.

다음으로 testdata 테이블에 테스트 데이타를 넣으십시오.

mysql> insert into testdata values(null, 'hello', 12345);
Query OK, 1 row affected (0.00 sec)

mysql> select * from testdata;
+----+-------+-------+
| ID | FOO   | BAR   |
+----+-------+-------+
|  1 | hello | 12345 |
+----+-------+-------+
1 row in set (0.00 sec)

mysql>

2. server.xml 설정

$CATALINA_HOME/conf/server.xml에 리소스 선언을 추가하여 Tomcat에서의 JNDI 데이타소스를 설정하십시오.

이것을 examples 컨텍스트의 </Context>와 localhost 정의를 닫는 태그인 </Host> 사이에 추가하십시오.

<Context path="/DBTest" docBase="DBTest"
        debug="5" reloadable="true" crossContext="true">

  <Logger className="org.apache.catalina.logger.FileLogger"
             prefix="localhost_DBTest_log." suffix=".txt"
             timestamp="true"/>

  <Resource name="jdbc/TestDB"
               auth="Container"
               type="javax.sql.DataSource"/>

  <ResourceParams name="jdbc/TestDB">
    <parameter>
      <name>factory</name>
      <value>org.apache.commons.dbcp.BasicDataSourceFactory</value>
    </parameter>

    <!-- Maximum number of dB connections in pool. Make sure you
         configure your mysqld max_connections large enough to handle
         all of your db connections. Set to 0 for no limit.
         -->
    <parameter>
      <name>maxActive</name>
      <value>100</value>
    </parameter>

    <!-- Maximum number of idle dB connections to retain in pool.
         Set to 0 for no limit.
         -->
    <parameter>
      <name>maxIdle</name>
      <value>30</value>
    </parameter>

    <!-- Maximum time to wait for a dB connection to become available
         in ms, in this example 10 seconds. An Exception is thrown if
         this timeout is exceeded.  Set to -1 to wait indefinitely.
         -->
    <parameter>
      <name>maxWait</name>
      <value>10000</value>
    </parameter>

    <!-- MySQL dB username and password for dB connections  -->
    <parameter>
     <name>username</name>
     <value>javauser</value>
    </parameter>
    <parameter>
     <name>password</name>
     <value>javadude</value>
    </parameter>

    <!-- Class name for mm.mysql JDBC driver -->
    <parameter>
       <name>driverClassName</name>
       <value>org.gjt.mm.mysql.Driver</value>
    </parameter>

    <!-- The JDBC connection url for connecting to your MySQL dB.
         The autoReconnect=true argument to the url makes sure that the
         mm.mysql JDBC Driver will automatically reconnect if mysqld closed the
         connection.  mysqld by default closes idle connections after 8 hours.
         -->
    <parameter>
      <name>url</name>
      <value>jdbc:mysql://localhost:3306/javatest?autoReconnect=true</value>
    </parameter>
  </ResourceParams>
</Context>

3. web.xml 설정

이제 테스트 애플리케이션에 대한 WEB-INF/web.xml을 만드십시오.

<?xml version="1.0" encoding="ISO-8859-1"?>
    <!DOCTYPE web-app PUBLIC
    "-//Sun Microsystems, Inc.//DTD Web Application 2.3//EN"
    "http://java.sun.com/dtd/web-app_2_3.dtd">
<web-app>
  <description>MySQL Test App</description>
  <resource-ref>
      <description>DB Connection</description>
      <res-ref-name>jdbc/TestDB</res-ref-name>
      <res-type>javax.sql.DataSource</res-type>
      <res-auth>Container</res-auth>
  </resource-ref>
</web-app>

4. 테스트 코드

이제 이후에 사용할 간단한 test.jsp 파일을 만드십시오.

<html>
  <head>
    <title>DB Test</title>
  </head>
  <body>

  <%
    foo.DBTest tst = new foo.DBTest();
    tst.init();
  %>

  <h2>Results</h2>
    Foo <%= tst.getFoo() %><br/>
    Bar <%= tst.getBar() %>

  </body>
</html>

새로 만들어진 데이타소스와 커넥션풀을 실제로 사용할 자바 클래스를 만드십시오. 주의: 이 코드는 실무에서 쓰일 만한 코드는 아닙니다. 단지 테스트 목적으로만 사용되는 것입니다. :-)

package foo;

import javax.naming.*;
import javax.sql.*;
import java.sql.*;

public class DBTest {

  String foo = "Not Connected";
  int bar = -1;
    
  public void init() {
    try{
      Context ctx = new InitialContext();
      if(ctx == null ) 
          throw new Exception("Boom - No Context");

      DataSource ds = 
            (DataSource)ctx.lookup(
               "java:comp/env/jdbc/TestDB");

      if (ds != null) {
        Connection conn = ds.getConnection();
              
        if(conn != null)  {
            foo = "Got Connection "+conn.toString();
            Statement stmt = conn.createStatement();
            ResultSet rst = 
                stmt.executeQuery(
                  "select id, foo, bar from testdata");
            if(rst.next()) {
               foo=rst.getString(2);
               bar=rst.getInt(3);
            }
            conn.close();
        }
      }
    }catch(Exception e) {
      e.printStackTrace();
    }
 }

 public String getFoo() { return foo; }
 public int getBar() { return bar;}
}

마지막으로 웹 애플리케이션을 $CATALINA_HOME/webappsDBTest.war라는 이름의 war 파일이나 DBTest라는 서브 디렉토리로 배치하십시오.

배치되고 나면 실제로 실행이 되는지 보기 위해 브라우저에서 http://localhost:8080/DBTest/test.jsp를 열어보십시오.

오라클 8i

0. 소개

글을 쓰는 이는 오라클 DBA가 아니기 때문에 이 섹션에 대한 어떤 비평도 고맙게 여길 것입니다. :-)

오라클은 일상적으로 아는 것 외에 mySQL 설정과 그다지 다르지 않습니다. 먼저 기본적으로 Tomcat은 $CATALINA_HOME/common/lib에 설치된 *.jar 파일들만을 읽어들이기 때문에 classes111.zipclasses12.zip 파일들은 .jar 확장자로 이름이 바뀔 필요가 있습니다. jar 파일은 zip 파일과 동일하기 때문에, unzip을 실행하고 다시 jar로 묶을 필요는 없으며 단지 이름만 바꾸면 됩니다. 또한 Tomcat 4.0의 몇몇 앞의 버전들은 JDK 1.4와 함께 사용되었을 때 classes12.zip 파일은 압축을 풀고 클래스 계층에서 javax.sql.*를 제거하고 다시 jar로 묶지 않으면 classes12.zip를 로드하지 못할 것입니다.

1. server.xml 설정

위에서 mysql 설정과 똑같은 방법으로 server.xml 파일에 데이타소스를 정의하면 됩니다. 한 예로 mysid라는 sid에 있는 myschema라는 스키마에 thin 드라이버를 사용하여 scott/tiger로 연결하는 myoracle이라는 데이타소스를 정의해보겠습니다. (주의: thin 드라이버를 사용할 때 sid는 tns 이름과 같은 것이 아닙니다.)

OCI 드라이버를 사용하려면 URL 문자열에 thin을 oci로 바꾸어 주어야 합니다.

<Resource name="jdbc/myoracle" auth="Container"
              type="javax.sql.DataSource"/> 

<ResourceParams name="jdbc/myoracle">
  <parameter>
    <name>factory</name>
    <value>org.apache.commons.dbcp.BasicDataSourceFactory</value>
  </parameter>
  <parameter>
    <name>driverClassName</name>
    <value>oracle.jdbc.driver.OracleDriver</value>
  </parameter>
  <parameter>
    <name>url</name>
    <value>jdbc:oracle:thin:myschema@127.0.0.1:1521:mysid</value>
  </parameter>
  <parameter>
    <name>username</name>
    <value>scott</value>
  </parameter>
  <parameter>
    <name>password</name>
    <value>tiger</value>
  </parameter>
  <parameter>
    <name>maxActive</name>
    <value>20</value>
  </parameter>
  <parameter>
    <name>maxIdle</name>
    <value>10</value>
  </parameter>
  <parameter>
    <name>maxWait</name>
    <value>-1</value>
  </parameter>
</ResourceParams>

2. web.xml 설정

애플리케이션의 web.xml 파일을 만들때 반드시 DTD에 정의된 순서대로 엘리먼트를 작성해야 합니다.

<resource-ref>
 <description>Oracle Datasource example</description>
 <res-ref-name>jdbc/myoracle</res-ref-name>
 <res-type>javax.sql.DataSource</res-type>
 <res-auth>Container</res-auth>
</resource-ref>

3. 코드 예제

(필요한 DB 인스턴스와 테이블 등을 만들었다고 가정하고) Datasource 코드를 조금 바꾸어서 위의 예제 애플리케이션을 사용할 수 있습니다.

Context initContext = new InitialContext();
Context envContext  = (Context)initContext.lookup("java:/comp/env");
DataSource ds = (DataSource)envContext.lookup("jdbc/myoracle");
Connection conn = ds.getConnection();
//etc.
PostgreSQL

0. 소개

PostgreSQL는 오라클과 동일한 방법으로 설정이 됩니다. 차이만을 여기서 다시 얘기하겠습니다. 이 부분은 아직 테스트하지는 않았으며 피드백을 주시면 고맙겠습니다.

1. server.xml 설정

<Resource name="jdbc/postgres" auth="Container"
          type="javax.sql.DataSource"/> 

<ResourceParams name="jdbc/postgres">
  <parameter>
    <name>factory</name>
    <value>org.apache.commons.dbcp.BasicDataSourceFactory</value>
  </parameter>
  <parameter>
    <name>driverClassName</name>
    <value>org.postgresql.Driver</value>
  </parameter>
  <parameter>
    <name>url</name>
    <value>jdbc:postgresql://127.0.0.1:5432/mydb</value>
  </parameter>
  <parameter>
    <name>username</name>
    <value>myuser</value>
  </parameter>
  <parameter>
    <name>password</name>
    <value>mypasswd</value>
  </parameter>
  <parameter>
    <name>maxActive</name>
    <value>20</value>
  </parameter>
  <parameter>
    <name>maxIdle</name>
    <value>10</value>
  </parameter>
  <parameter>
    <name>maxWait</name>
    <value>-1</value>
  </parameter>
</ResourceParams> 

2. web.xml 설정

<resource-ref>
 <description>postgreSQL Datasource example</description>
 <res-ref-name>jdbc/mydb</res-ref-name>
 <res-type>javax.sql.DataSource</res-type>
 <res-auth>Container</res-auth>
</resource-ref>
Tyrex 커넥션 풀 Tyrex Connection Pool
소개

Tomcat 4.1은 Tyrex 1.0을 사용하여 트랜잭션 관리와 리소스 설정 지원 기능을 제공합니다. 이는 사용자가 표준 javax.transaction.UserTransaction뿐 아니라 JNDI 네임스페이스로부터도 JTA/JCA 리소스를 얻을 수 있도록 합니다..

필요한 jar 설치

웹 애플리케이션이 Tyrex를 사용하도록 하기 위해서 webapp와 Tomcat은 Tyrex jar와 Tyrex jar가 필요로 하는 jar 파일들에 접근할 필요가 있습니다. 아래에 필요한 jar 파일들과 이를 구할 수 있는 곳의 리스트가 있습니다.

다음 jar 파일들은 http://tyrex.exolab.org에서 구할 수 있는 Tyrex 바이너리 배포판에 포함되어 있습니다.

  • tyrex-1.0.jar
  • ots-jts_1.0.jar
  • jta_1.0.1.jar
  • xerces-J_1.4.0.jar
다음 두 jar 파일도 역시 필요합니다.

이들 여섯 개의 jar 파일들은 Tomcat과 웹 애플리케이션에서 읽을 수 있도록 $TOMCAT_HOME/common/lib에 넣어야 합니다.

Tyrex 설정

Tyrex 문서(http://tyrex.exolab.org)는 Tyrex를 설정하는 방법에 대해 아주 상세하게 설명을 하고 있습니다. 한 예로서 Tyrex 도메인 설정 XML 파일에 쓰여진 아래의 Tyrex 설정을 사용해 볼 것입니다.

<domain>
  <name>myDomain</name>
  <resources>
    <dataSource>
      <name>myDatasource</name>
      <jar>/home/david/mm.mysql-2.0.14-bin.jar</jar>
      <class>org.gjt.mm.mysql.jdbc2.optional.MysqlXaDataSource</class>
      <config>
        <user>david</user>
        <password>secret</password>
        <serverName>localhost</serverName>
        <port>3306</port>
        <database>daviddb</database>
      </config>
    </dataSource>
  </resources>
</domain>

몇 가지 유의사항이 있습니다.

  • jar 파일의 절대경로를 써야 합니다.(상대경로로는 Tyrex는 현 디렉토리만을 찾는데 이는 우리가 원하는 것은 아닐 것입니다.) URL을 써넣어도 됩니다.
  • config 엘리먼트 안에 포함된 모든 엘리먼트들은 표준 설정자 메소드(setter)를 사용하여 datasource 클래스에 매개변수로 전달됩니다.
  • http://tyrex.exolab.org/configuration.html에서 Tyrex를 설치하는 더 나은 설명뿐 아니라 더 많은 설정 옵션을 볼 수 있습니다.

이 XML 설정 파일은 Tomcat의 클래스로더가 getResource() 메소드를 사용하여 찾을 수 있는 위치에 있으면 됩니다. 이는 웹애플리케이션 아래의 WEB-INF/classes 디렉토리도 ?I찮다는 얘기입니다.

톰캣 설정

Tyrex XML 설정파일을 만들었다면 JNDI 네임스페이스에 Tyrex 리소스를 등록하여야 합니다. 이것은 Tomcat의 server.xml 파일에서 하면 됩니다. 두가지 중요한 패러미터가 쓰여져야 하는데 도메인 설정 파일 이름(tyrexDomainConfig)과 사용될 Tyrex 도메인 이름(tyrexDomainName)입니다. 이는 다음과 같이 환경 매개변수로서 세팅하면 됩니다.

<Environment name="tyrexDomainConfig" type="java.lang.String" value="domain-config.xml"/>
<Environment name="tyrexDomainName" type="java.lang.String" value="myDomain"/>

(웹 애플리케이션의 <Context> 엘리먼트 아래에) 이제 리스소를 설정해야 합니다.

<Resource name="my-datasource" auth="Container" type="tyrex.resource.Resource"/>
<ResourceParams name="my-datasource">
  <parameter>
    <name>name</name>
    <value>myDataSource</name>
  </parameter>
</ResourceParams>

몇 가지 지적할 것이 있습니다.

  • 리스소의 type은 Tyrex를 어떻게 설정하였는지와 상관없이 tyrex.resource.Resource이어야 합니다.
  • 오직 하나의 ResourceParam 패러미터 name(Tyrex 설정 파일에 쓰여진 리소스 이름)만이 필요합니다.
  • Tomcat/JNDI 리소스와 Tyrex 리소스 간의 차이를 주목하십시오.(처음 보면 혼동이 될 것입니다.)
애플리케이션 작성

Tyrex 리소스를 사용하는 것은 이제 상대적으로 간단할 것입니다. 데이타소스를 얻기 위해서 단지 JNDI를 사용하기만 하십시오.

InitialContext initCtx = new InitialContext();
DataSource ds = (DataSource) initCtx.lookup("java:comp/env/my-datasource");
Connection conn = ds.getConnection();
...and so on.

Tyrex는 표준 위치에서의 JNDI(java:comp/UserTransaction)에서 얻을 수 있는 javax.transaction.UserTransaction도 제공하고 있습니다.

DBCP를 사용하지 않는 방법들 Non DBCP Solutions

이런 방법들은 데이타베이스에 매번 커넥션을 연결하여 사용하는 것이거나(테스트 외에는 권장하지 않습니다.) 다른 풀링 기술을 사용하는 것입니다.

OCI 클라이언트로 Oracle8i 연결 Oracle 8i with OCI client
소개

OCI 클라이언트를 사용하여 JNDI 데이타소스를 생성하는 것을 자세히 설명하지는 않으며 위의 Oracle and DBCP solution과 결합될 수 있는 부분입니다.

OCI 드라이버를 사용하기 위하여 먼저 오라클 클라이언트가 설치되어야 합니다. 씨디에서 Oracle8i(8.1.7)를 설치하고 otn.oracle.com에서 적당한 JDBC/OCI 드라이버(Oracle8i 8.1.7.1 JDBC/OCI Driver)를 다운로드하십시오..

Tomcat에서 사용하기 위해서 classes12.zipclasses12.jar로 이름을 바꾼 다음에, $CATALINA_HOME/common/lib에 복사를 하십시오. 사용하고 있는 Tomcat과 JDK 버전에 따라서는 javax.sql.* 클래스를 빼야 할 수도 있습니다.

결합하기 Putting it all together

$PATHLD_LIBRARY_PATHocijdbc8.dll.so이 있는지($ORAHOME\bin에 있는 파일) 확인하고 System.loadLibrary("ocijdbc8");를 사용하는 간단한 테스트 프로그램을 이용하여 네이티브 라이브러리가 로드되는지도 확인하십시오.

이제 다음 라인들을 포함한 간단한 테스트 서블릿이나 jsp를 작성하십시오.

DriverManager.registerDriver(new
oracle.jdbc.driver.OracleDriver());
conn =
DriverManager.getConnection("jdbc:oracle:oci8:@database","username","password");

먼저 UnsatisfiedLinkError가 나오면 다음과 같은 문제가 있다는 것을 말합니다.

  • JDBC 클래스 파일과 오라클 클라이언트 버전이 서로 맞지 않는 것입니다. 이는 필요한 라이브러리 파일을 찾을 수 없다는 얘기입니다. 예를 들어 8.1.5 오라클 클라이언트 버전을 가지고서 8.1.6 오라클 버전에 있는 classes12.zip을 사용하고 있을 수도 있는 것입니다. classesXXXs.zip 파일과 오라클 클라이언트 프로그램은 일치해야 합니다.
  • $PATHLD_LIBRARY_PATH 문제
  • otn에서 다운로드한 드라이버는 인식하지 않고 $ORAHOME\jdbc\lib에 있는 classes12.zip 파일이 잘 작동한다고 알려지고 있습니다.

다음으로 ORA-06401 NETCMN: invalid driver designator 에러를 경험할 수도 있습니다.

오라클 문서에서는 "로그인(연결) 문자열이 유효하지 않은 드라이버를 지정해서 생기는 에러이며 문자열을 고쳐서 다시 연결을 시도하라"고 되어 있습니다. 데이타베이스 연결 문자열(host:port:SID 형태)을 다음과 같이 바꾸십시오. (description=(address=(host=myhost)(protocol=tcp)(port=1521))(connect_data=(sid=orcl)))

TNS이름을 정리하는 것이 정말로 필요한 것 같지는 않습니다. 물론 저는 오라클 DBA가 아니기 때문에 확실한 것은 아닙니다.(역자주: 믿지는 마십시오.)

일반적으로 일어날 수 있는 문제 Common Problems

데이타베이스를 사용하는 웹 애플리케이션에서 겪게되는 일반적인 문제와 이를 해결하는 방법에 대한 팁들을 이제 얘기하도록 하겠습니다.

가끔 데이타베이스 연결이 되지 않는 문제 Intermittent dB Connection Failures

Tomcat은 JVM내에서 구동합니다. JVM은 주기적으로 더 이상 사용하지 않는 자바 객체를 제거하기 위해 가비지 컬렉션(GC)을 실행합니다. JVM이 Tomcat내 코드의 GC를 실행하면 Tomcat은 동작을 멈춥니다. 데이타베이스 연결 최대시간이 가비지 컬렉션 시간보다 작다면 데이타베이스 연결 에러를 보게 될 것입니다.

카비지 콜렉션이 얼마나 오래 걸리는지에 대한 데이타를 모으기 위해서는 Tomcat이 시작될 때 CATALINA_OPTS-verbose:gc 변수를 추가하십시오. verbose gc 옵션이면 $CATALINA_BASE/logs/catalina.out 로그 파일이 가비지 컬렉션이 얼마나 걸리는지를 포함한 모든 데이타를 포함할 것입니다.

JVM이 99%로 잘 조정되었을 때 GC는 일초 이하가 걸릴 것입니다. 그 외에도 몇 초밖에 걸리지 않습니다. 아주 드물게 GC에 10초 이상 걸릴 수도 있습니다.

데이타베이스 연결 초과시간을 반드시 10초에서 15초 사이로 정하십시오. DBCP에서는 maxWait 매개변수를 사용하여 설정하십시오.

임의 연결 닫힘 오류 Random Connection Closed Exceptions

이것은 한 요청이 커넥션풀에서 디비 연결을 하나 가져와서 그것을 두번 닫으려고 할때 일어날 수 있습니다. 커넥션풀을 사용할 때는 연결을 닫으면 다른 요청에서 재사용하기 위해 풀로 돌아가는 것이지 커넥션을 닫는 것이 아닙니다. 그리고 Tomcat은 동시적인 요청들을 처리할 다중 스레드를 사용합니다. Tomcat에서 이런 에러가 일어날 수 있는 일련의 이벤트의 예가 있습니다.

  쓰레드 1에서 실행되는 요청 1이 디비 연결을 얻습니다.

  요청 1이 디비 연결을 닫습니다.

  JVM이 쓰레드2로 실행 스레드를 전환합니다.

  쓰레드 2에서 실행되는 요청 2가 디비 연결(요청 1이 막 반납한 같은 연결)을 얻습니다.

  JVM은 실행 쓰레드를 스레드 1로 다시 전환합니다.

  요청 1은 마지막에 디비 연결을 두 번 닫습니다.

  JVM은 실행 쓰레드를 또 다시 쓰레드 2로 전환합니다.

  쓰레드 2의 요청 2는 디비 연결을 사용하고자 하지만 요청 1이 이미 닫았기 때문에 실패하게 됩니다.
이제 커넥션 풀에서 얻은 디비 연결을 사용하는 적절한 코드 예를 보이겠습니다.
  Connection conn = null;
  Statement stmt = null;  // Or PreparedStatement if needed
  ResultSet rs = null;
  try {
    conn = ... get connection from connection pool ...
    stmt = conn.createStatement("select ...");
    rs = stmt.executeQuery();
    ... iterate through the result set ...
    rs.close();
    rs = null;
    stmt.close();
    stmt = null;
    conn.close(); // Return to connection pool
    conn = null;  // Make sure we don't close it twice
  } catch (SQLException e) {
    ... deal with errors ...
  } finally {
    // Always make sure result sets and statements are closed,
    // and the connection is returned to the pool
    if (rs != null) {
      try { rs.close(); } catch (SQLException e) { ; }
      rs = null;
    }
    if (stmt != null) {
      try { stmt.close(); } catch (SQLException e) { ; }
      stmt = null;
    }
    if (conn != null) {
      try { conn.close(); } catch (SQLException e) { ; }
      conn = null;
    }
  }
2008. 4. 11. 07:00
/*---------------------------------------------

* String 문자 자르기.
---------------------------------------------*/
String.prototype.cut = function(len) {
var str = this;
var l = 0;
for (var i=0; i<str.length; i++) {
  l += (str.charCodeAt(i) > 128) ? 2 : 1;
  if (l > len) return str.substring(0,i);
}
return str;
}

/*---------------------------------------------

* String 공백 지우기.
---------------------------------------------*/
String.prototype.trim = function(){
// Use a regular expression to replace leading and trailing
// spaces with the empty string
return this.replace(/(^\s*)|(\s*$)/g, "");
}

/*---------------------------------------------
* String 총 바이트 수 구하기.
---------------------------------------------*/
String.prototype.bytes = function() {
var str = this;
var l = 0;
for (var i=0; i<str.length; i++) l += (str.charCodeAt(i) > 128) ? 2 : 1;
return l;
}

/*---------------------------------------------
* iframe의 height를 body의 내용만큼 자동으로 늘려줌.
---------------------------------------------*/
function resizeRetry(){
if(ifrContents.document.body.readyState == "complete"){
  clearInterval(ifrContentsTimer);
}
else{
  resizeFrame(ifrContents.name);
}
}

var ifrContentsTimer;
var ifrContents;

function resizeFrame(name){

        var oBody = document.body;
        var oFrame = parent.document.all(name);
  ifrContents = oFrame;
        var min_height = 613; //iframe의 최소높이(너무 작아지는 걸 막기위함, 픽셀단위, 편집가능)
        var min_width = 540; //iframe의 최소너비
        var i_height = oBody.scrollHeight + 10;

        var i_width = oBody.scrollWidth + (oBody.offsetWidth-oBody.clientWidth);

        if(i_height < min_height) i_height = min_height;
        if(i_width < min_width) i_width = min_width;
        oFrame.style.height = i_height;
        ifrContentsTimer = setInterval("resizeRetry()",100);
}

/*---------------------------------------------
* 클립보드에 해당 내용을 복사함.
---------------------------------------------*/

function setClipBoardText(strValue){
window.clipboardData.setData('Text', strValue);
alert("" + strValue +" \n\n위 내용이 복사되었습니다.\n\nCtrl + v 키를 사용하여, 붙여 넣기를 사용하실 수 있습니다.");
}


/*---------------------------------------------
select 에서 기존의 선택 값이 선택되게
----------------------------------------------*/
function selOrign(frm,val){
for(i=0; i < frm.length ; i++){
  if(frm.options[i].value == val){
   frm.options.selectedIndex = i ;
   return;
  }
}
}

/*---------------------------------------------
checkbox 에서 기존의 선택 값이 선택되게
----------------------------------------------*/
function chkboxOrign(frm,val){
if(frm.length == null){
  if(frm.value == val)
   frm.checked = true;
}else{
  for(i=0;i<frm.length;i++){
   if(frm[i].value == val){
    frm[i].checked = true;
   }
  }
  return;
}
}

function chkboxOrign_multi(frm,objchk,val){
var i = 0;
for(i=0;i<frm.elements.length;i++){
  if(frm.elements[i].name == objchk){
   if(frm.elements[i].value == val){
    frm.elements[i].checked = true;
   }
  }
}
}

/*---------------------------------------------
radio 에서 기존의 선택 값이 선택되게
----------------------------------------------*/
function radioOrign(frm,val){
for(i=0; i < frm.length ; i++){
  if(frm[i].value == val){
   frm[i].checked = true ;
   return ;
  }
}
}

/*---------------------------------------------
숫자만 입력받기
예) onKeyDown="return onlyNum();"
----------------------------------------------*/
function onlyNum(){
if(
  (event.keyCode >= 48 && event.keyCode <=57) ||
  (event.keyCode >= 96 && event.keyCode <=105) ||
  (event.keyCode >= 37 && event.keyCode <=40) ||
  event.keyCode == 9 ||
  event.keyCode == 8 ||
  event.keyCode == 46
  ){
  //48-57(0-9)
  //96-105(키패드0-9)
  //8 : backspace
  //46 : delete key
  //9 :tab
  //37-40 : left, up, right, down
  event.returnValue=true;
}
else{
  //alert('숫자만 입력 가능합니다.');
  event.returnValue=false;
}
}

/*---------------------------------------------
지정된 길이반큼만 입력받기
예) onKeyUp="return  checkAllowLength(현재숫자보여지는객체,숫자셀객체 ,80);" onKeyDown="return checkAllowLength(현재숫자보여지는객체,숫자셀객체 ,80);"
----------------------------------------------*/

function checkAllowLength(objView, objTar, max_cnt){
if(event.keyCode > 31 || event.keyCode == "") {
  if(objTar.value.bytes() > max_cnt){
   alert("최대 " + max_cnt + "byte를 넘길 수 없습니다.");
   objTar.value = objTar.value.cut(max_cnt);
  }
}
objView.value = objTar.value.bytes();
}

 
/*--------------------------------------------
이미지 리사이즈
---------------------------------------------*/
function resizeImg(imgObj, max_width, max_height){

var dst_width;
var dst_height;
var img_width;
var img_height;

img_width = parseInt(imgObj.width);
img_height = parseInt(imgObj.height);

if(img_width == 0 || img_height == 0){
  imgObj.style.display = '';
  return false;
}

    // 가로비율 우선으로 시작
    if(img_width > max_width || img_height > max_height) {
        // 가로기준으로 리사이즈
        dst_width = max_width;
        dst_height = Math.ceil((max_width / img_width) * img_height);

        // 세로가 max_height 를 벗어났을 때
        if(dst_height > max_height) {
   dst_height = max_height;
   dst_width = Math.ceil((max_height / img_height) * img_width);
        }

        imgObj.width = dst_width;
        imgObj.height = dst_height;
    }
    // 가로비율 우선으로 끝

imgObj.style.display = '';

return true;
}
/*---------------------------------------------
xml data 읽어오기
----------------------------------------------*/
function getXmlHttpRequest(_url, _param){
    var objXmlConn;
    try{objXmlConn = new ActiveXObject("Msxml2.XMLHTTP.3.0");}
    catch(e){try{objXmlConn = new ActiveXObject("Microsoft.XMLHTTP");}catch(oc){objXmlConn = null;}}

    if(!objXmlConn && typeof XMLHttpRequest != "undefined") objXmlConn = new XMLHttpRequest();

    objXmlConn.open("GET", _url + "?" + _param, false);
    objXmlConn.send(null);

//code|message 형태로 리턴
    return objXmlConn.responseText.trim().split("|");
}


/*---------------------------------------------------
cookie 설정
-------------------------------------------------------*/

function getCookieVal (offset) {
   var endstr = document.cookie.indexOf (";", offset);
   if (endstr == -1) endstr = document.cookie.length;
   return unescape(document.cookie.substring(offset, endstr));
}

function GetCookie (name) {
   var arg = name + "=";
   var alen = arg.length;
   var clen = document.cookie.length;
   var i = 0;
   while (i < clen) { //while open
      var j = i + alen;
      if (document.cookie.substring(i, j) == arg)
         return getCookieVal (j);
      i = document.cookie.indexOf(" ", i) + 1;
      if (i == 0) break;
   } //while close
   return null;
}

function SetCookie (name, value) {
   var argv = SetCookie.arguments;
   var argc = SetCookie.arguments.length;
   var expires = (2 < argc) ? argv[2] : null;
   var path = (3 < argc) ? argv[3] : null;
   var domain = (4 < argc) ? argv[4] : null;
   var secure = (5 < argc) ? argv[5] : false;
   document.cookie = name + "=" + escape (value) +
      ((expires == null) ? "" :
         ("; expires=" + expires.toGMTString())) +
      ((path == null) ? "" : ("; path=" + path)) +
      ((domain == null) ? "" : ("; domain=" + domain)) +
      ((secure == true) ? "; secure" : "");
}

/* ---------------------------------------------
* 함수명 : checkSpecialChar
* 설  명 : 특수문자 체크
* 예) if(!checkSpecialChar()) return;
---------------------------------------------*/
function checkSpecialChar(_obj){
    if(_obj.value.search(/[\",\',<,>]/g) >= 0) {
        alert("문자열에 특수문자( \",  ',  <,  > )가 있습니다.\n특수문자를 제거하여 주십시오!");
        _obj.select();
        _obj.focus();
    }
}
2008. 3. 25. 07:00

インターネットバンキングやネットショッピングなどのように、インターネットを通じてWebブラウザから操作する仕組みを使って金融取引や通信販売などのサービスを提供する場合、第三者による不正行為を防止するために、利用者とサービス提供者以外に対して情報が漏洩することを防ぐ必要がある。

そこで現在、一般的に採用されている方法が、SSLによる暗号化通信機能を付加したHTTPによる通信である。SSL通信やHTTPS通信と呼ばれることが多く、実質的に業界標準といえる。JavaもHTTPS通信に対応しており、HTTPSによって提供されているサイトにアクセスすることができる。

URLConnection - HTTPS通信にも対応

アクセス先はURIで保持しておき、使う段階でURLに変換して使う。そして実際の通信はURLConnectionを経由して実施する。これはHTTPプログラミングを実施する際の基本だ。これについては第54回「HTTP通信の基礎(1) - URIとURL、URLConnection」で説明した。

同回において、実際にURLConnectionを使ってアクセスし、ヘッダとコンテンツを取得するソースコードを紹介した。同ソースコードを使ってHTTPSでサービスを提供しているサイトのコンテンツを取得させてみてほしい。

リスト1 NetCat.java

import java.io.*;
import java.net.*;
import java.util.*;

public class NetCat {
    public static void main(String[] argv)
        throws Exception {
        URI uri = new URI(argv[0]);
        URLConnection connection = uri.toURL().openConnection();

        // ヘッダ情報を出力
        Map headers = connection.getHeaderFields();
        for (Object key : headers.keySet()) {
            System.out.println(key + ": " + headers.get(key));
        }

        // コンテンツを出力
        BufferedReader reader =
            new BufferedReader(new InputStreamReader
                (connection.getInputStream(), "JISAutoDetect"));
        String buffer = reader.readLine();
        System.out.println();
        while (null != buffer) {
            System.out.println(buffer);
            buffer = reader.readLine();
        }
    }
}

プロンプト1 NetCat.java を使ってHTTPS通信で提供されているサイトにアクセス

% java NetCat https://www.example.com/
Connection: [close]
Date: [Mon, 24 Jul 2006 04:07:53 GMT]
null: [HTTP/1.1 200 OK]
Pragma: [no-cache]
Server: [Apache]
Content-Type: [text/html; charset=EUC-JP]
Transfer-Encoding: [chunked]
Cache-Control: [no-cache]
Vary: [Accept-Encoding]

<html>
<head>
...
%

プロンプト1が実行例だ。HTTPSでサービスが提供されているサイトも、HTTPの場合と同じように表示されていることがわかる。URLConnectionは抽象クラスであり、実際にはHttpURLConnectionやHttpsURLConnection、JarURLConnectionなどのサブクラスを経由して使うことになる。つまり、ただ単に通信を実施してコンテンツのやりとりをおこなう程度であれば、URLConnectionを使っておけばよいことがわかる。

HTTPSに特化した処理は HttpsURLConnection を使う

HTTPSに特化した処理はURLConnectionではなく、HttpsURLConnectionを使う。HttpsURLConnectionはHttpURLConnectionを継承したクラスであるため、HTTPと共通の機能はHttpURLConnectionを使えばよく、SSL特有の処理が必要な場合にだけHttpsURLConnectionを使えばいい。HttpsURLConnectionを使った例をリスト2に示す。URLConnectionインスタンスをHttpsURLConnectionインスタンスにキャストして使っていることがわかるだろう。HTTPSで通信を実施した場合、実体はHttpsURLConnectionだからキャストが可能だ。

リスト2 SSLNetCat.java

import java.io.*;
import java.net.*;
import java.util.*;
import javax.net.ssl.*;

public class SSLNetCat {
    public static void main(String[] argv)
        throws Exception {
        URI uri = new URI(argv[0]);
        URLConnection connection = uri.toURL().openConnection();

        // ヘッダ情報を出力
        Map headers = connection.getHeaderFields();
        for (Object key : headers.keySet()) {
            System.out.println(key + ": " + headers.get(key));
        }

        // SSL情報を出力
        HttpsURLConnection sslconnection =
            (HttpsURLConnection)connection;
        System.out.println();
        System.out.println("符号化方式:" + sslconnection.getCipherSuite());

        // コンテンツを出力
        BufferedReader reader =
            new BufferedReader(new InputStreamReader
                (connection.getInputStream(), "JISAutoDetect"));
        String buffer = reader.readLine();
        System.out.println();
        while (null != buffer) {
            System.out.println(buffer);
            buffer = reader.readLine();
        }
    }
}

プロンプト2 SSLNetCat.java を使ってHTTPS通信で提供されているサイトにアクセス

% java SSLNetCat https://www.example.com/
Connection: [close]
Date: [Mon, 24 Jul 2006 04:30:09 GMT]
null: [HTTP/1.1 200 OK]
Pragma: [no-cache]
Server: [Apache]
Content-Type: [text/html; charset=EUC-JP]
Transfer-Encoding: [chunked]
Cache-Control: [no-cache]
Vary: [Accept-Encoding]

符号化方式:SSL_RSA_WITH_RC4_128_MD5

<html>
<head>
...
% l

ためしにリスト2をHTTPS通信ではないサイトの通信に適用してみるといい。キャストに失敗して処理が終了する。HTTPS通信でない場合はHttpsURLConnectionへはキャストできない。

HttpsURLConnection

HttpsURLConnectionにはほかにもハンドシェーク中にサーバとやりとりした証明書や、セッションを定義する段階における主体などを得るためのメソッドも用意されている。接続先の制御や細かい制御をおこないたい場合は、これらメソッドを通じて情報を取得することになる。

HttpsURLConnectionを使わなくとも、URLConnectionを使っていればHTTP/HTTPSの両方が同じように扱える点は、Java APIの便利なところといえるだろう。ちなみにHttpsURLConnectionはjava.netパッケージではなく、javax.net.sslパッケージにまとめられている。importを忘れないようにしたい。

[출처] https通信|작성자 이씨

2008. 3. 25. 07:00
/*
* http://forum.java.sun.com/thread.jspa?threadID=521779&tstart=90 * File name: TestServlet.java * * Created on 2005.01.21. */
package georgie.test.servlet; import java.io.BufferedReader; import java.io.IOException; import java.io.InputStreamReader; import java.net.URL; import javax.net.ssl.HostnameVerifier; import javax.net.ssl.HttpsURLConnection; import javax.net.ssl.SSLSession; import javax.servlet.ServletException; import javax.servlet.http.HttpServlet; import javax.servlet.http.HttpServletRequest; import javax.servlet.http.HttpServletResponse; /** * @author György Novák */ public class TestServlet extends HttpServlet { protected void doGet(HttpServletRequest request, HttpServletResponse response) throws ServletException, IOException { try { trustAllHttpsCertificates(); String urlStr = request.getParameter("url"); HttpsURLConnection.setDefaultHostnameVerifier(hv); URL url = new URL(urlStr == null ? "https://www.verisign.com/" : urlStr); debug("URL READY"); BufferedReader in = new BufferedReader(new InputStreamReader(url .openStream())); debug("INPUT READY"); int buff; while ((buff = in.read()) != -1) { } in.close(); debug("EVERYTHING IS DONE!!!"); } catch (Exception e) { e.printStackTrace(); } } HostnameVerifier hv = new HostnameVerifier() { public boolean verify(String urlHostName, SSLSession session) { System.out.println("Warning: URL Host: " + urlHostName + " vs. " + session.getPeerHost()); return true; } }; private void debug(String s) { System.out.println("[DEBUG] -- TestServlet -- \n" + s); } private static void trustAllHttpsCertificates() throws Exception { // Create a trust manager that does not validate certificate chains: javax.net.ssl.TrustManager[] trustAllCerts = new javax.net.ssl.TrustManager[1]; javax.net.ssl.TrustManager tm = new miTM(); trustAllCerts[0] = tm; javax.net.ssl.SSLContext sc = javax.net.ssl.SSLContext.getInstance("SSL"); sc.init(null, trustAllCerts, null); javax.net.ssl.HttpsURLConnection.setDefaultSSLSocketFactory( sc.getSocketFactory()); } public static class miTM implements javax.net.ssl.TrustManager, javax.net.ssl.X509TrustManager { public java.security.cert.X509Certificate[] getAcceptedIssuers() { return null; } public boolean isServerTrusted( java.security.cert.X509Certificate[] certs) { return true; } public boolean isClientTrusted( java.security.cert.X509Certificate[] certs) { return true; } public void checkServerTrusted( java.security.cert.X509Certificate[] certs, String authType) throws java.security.cert.CertificateException { return; } public void checkClientTrusted( java.security.cert.X509Certificate[] certs, String authType) throws java.security.cert.CertificateException { return; } } }
prev"" #1 next