Driver PCTV 800e
http://cdn.pinnaclesys.com/SupportFiles/PCTV%20Drivers/ReadmePCTV.htm
TV viewing and PVR application for Windows XP
http://www.pctvsystems.com/tabid/62/default.aspx/Downloads/Application/TVC6Download/tabid/214/language/en-US/Default.aspx

관련파일 :
END
H/W - myLG070 공유기 문제
myLG070을 며칠간 사용을 했다. 소프트웨어가 오늘 또 버전이 바뀌었다.
서비스 초창기라 그런지, 불통율이 너무 높고, 불안하다.
하지만 , LG데이콤 070이 3가지 지적하는 것만 고치면 , 성공 가능성도 있다.
일단 핸드셋 전화기의 문제.
1. 무선인터넷 11g 기반이므로 SSID를 사용한다. 당연히.
그런데 , 핸드셋 무선랜 설정에 가보면, 설정이란 말이 무색하게 ,
첫번째로 무조건 myLG070 이란 SSID가 떡 하니 버티고 있고,
초기접속을 시도할 우선순위를 조절할 수도 없다.
무조건 핸드셋 키면 myLG070이란 SSID를 찾아보게 해논 것이다.
매우 불합리하다.
그러나 전용 AP를 사용하게 되면 , myLGNet이란 기본 컴퓨터통신용 SSID가 있고 ,
그 외에 전화기용으로 사용하는 것 같은 숨겨진 SSID가 하나 더 있다.
아마 이 숨겨진 SSID의 이름이 myLG070이 아닐까 추측해보며, 이를 통하여 전화기는 자동으로 최우선적으로 연결되는 것 같다.
당연한 말이겠지만, 전용 AP만 사용하는 경우엔 전화기를 껐다 켰을 때 SSID를 잘못 연결하여 전화가 안걸리는 경우가 거의 없다.
====================================================================================
==> 앵님께서 그 우선순위를 변경할 수 있는 우회방법을 알려주셨다. (감사합니다. 그런데 혹시 LG직원분? 이건 어떻게?)
그러나 , 직접 해보니 , 통화음만 뚜~ 하고 한번 울리고는 응답이 없더이다...
서비스코드가 바뀌었거나 , 유출되서 막았거나 한거 같습니다.
1. 070전화기를 들고 *25533# 라고 누르고
2. (통화버튼)을 누른다. 그러면 아래와 같이 [시스템 설정] 화면이 나온다.
-- 1. 핑테스트
2. myLG070 프로파일
3. 2번 myLG070 프로파일을 선택하여 들어간다.
4. 들어가면 1.비활성화 2.활성화 둘중 택일 할 수 있다.
여기서 1번 비활성화를 선택하면 기본설정인 myLG070 프로파일이 비활성화가 되어 선택이 안되므로,
사용자가 사용하는 무선공유기의 SSID를 최우선으로 선택할 수 있는 길이 열린다.
5. 다시 기본 프로파일을 사용하려면 똑같은 방법으로 들어가 활성화 시키면 된다.
====================================================================================
2. myLG070 전용 AP(유무선 공유기)의 문제점 : 사용자수 30만명이 넘었다는 콜센터 직원의 말은 들었다.
그러나 아직은 인터넷 전화라는게 나이드신 분들이 쉽게 설치해 쓰는게 아니라,
인터넷을 쉽게 생각하거나 , 또는 공유기좀 만져봤다 하는 사람들이 신청해서 주 사용층을 이룬다.
그럼, 그 사람들이 무선 공유기 하나쯤은 있으리란 생각을 LG데이콤은 좀 해봤어야 하지 않을까?
나도 역시 전용AP보다 성능상 더 좋고, 편한 MiMo 무선 공유기를 사용중이다.
앞으론 11n 방식의 공유기도 쓰게 될 것이다.
그렇다면 , LG데이콤은 과감하게 저급한 성능의 전용AP 사용자가 아닌 사람을 위한 배려로
기존 사용자의 AP에서 사용하는 SSID를 최우선으로 올릴 수 있게 오픈 해줘야,
핸드셋을 껏다 켰을 때 발생하는 통신접속 불량율을 줄일 수 있을 것이다.
3. 문제점 2 : 위와 같은 연유로 인하여 세상에 널리 뿌려져있는 11g 이상의 무선공유기들을 myLG070이 포용하려는 정책을
펴게 되면 전용 AP를 늘 최신판으로 개발해야 하는 기업의 부담을 없앨 수 있기 때문이다.
** 최신판 AP란? = 이제는 최소 MiMo 11n draft2.0쯤은 되야.....
*** myLG070 핸드셋 사용 팁 하나.
좀 귀찮긴 하지만 , 핸드셋이 IP를 받는 방식을 DHCP(자동할당)방식에서 지정IP 방식으로 바꾸면 재부팅시나,
껐다 켰을 때 접속 불량(전화그림에 X자표시)이 좀 줄어드는 것 같습니다. 느낌상인가?
또한 암호화 방식을 최소설정이 WEP 64bit 방식으로 하면 동일조건에서 안테나 더 많이 뜨더군요.
사용시 참고하시기 바랍니다.
그러나 전용 AP를 사용할 경우엔 기본 SSID 접속 보안방식이나 IP등 기타 어떤 내용도 수정이 불가합니다.
어쩌면 서비스 사업자 입장에선 그것이 더 효율적이기 때문이겠지요.
*** 2008-03-26 오늘자 lg070 폰 정보
s/w 버전 : WPN480H-1.1.56
*** 2008-05-22 오늘자 lg070 폰 정보
s/w 버전 : WPN480H-1.1.64 (뭐가 좋아진걸까?)[출처] myLG 070 , myLGNet 사업 대박, 전화기에서 공유기 고치면 서비스 성공한다. 통화불량 개선점. 잘 걸리게 하는법.|작성자 베이더경
apa-2000 펌웨워
apa-3000 펌웨어(에이엘테크 제조)
- 그러나 펌웨어 없네..뭐냐
<무선공유기 비밀번호 초기화 방법>
공유기 뒷면의 RESET 버튼을 이쑤시게등으로 4~10초를 누른다.
그러면 LED등이 깜박이면서 재시작됩니다. 깜빡이지 않았다면 더 길게 눌러줘야 한다.
기본네트워크 키값이 123456789a 로 변경된다.
공유기접속비밀번호가 admin로 변경된다.
http://www.dd-wrt.com/wiki/index.php/WRT54G_v4_Installation_Tutorial
이참에 펌웨어 업그레이드나 하려고 하다가 얻은 자료입니다.
덕분에 파일 끌어올때 멈춤현상도 없어지고... (오늘 설치해서 잘 모르겠지만) 나름대로 빨라졌다고 생각합니다.
펌웨어 업그레이드의 중요한 점!!
용량 제한때문에 mini 로 업데이트 한다음에 정식버전으로 갈아타야 한다는거죠..
WRT버전도 있긴 한데.... 처음에 멋모르고 그걸로 업그레이드 했다가 낭패....
간신히 살려서 generic 버전으로 바꿨습니다.
WRT54G v4 사용자분은 꼭 Gerneric 버전으로 하세요.....
mini :
dd-wrt.v23_mini_generic.bin
generic :
dd-wrt.v23_generic.bin
기본 ID와 Passwrod는 root / admin 입니다. 부디 긴장하지 마시길......
이건 제 백업용 설정파일(방화벽OFF, 암호 바뀐 파일)
setting.bin
공유기 설정화면(웹접속)이 안되는 문제가 생기면...
공유기 뒤쪽에 Reset 버튼을 Power LED가 깜빡거릴 때까지 꾹 누르고 있으면 Factory Default 로 초기화 됩니다.
WRT54G v4 Installation Tutorial
From DD-WRT Wiki
The following are the steps that I went through to get DD-WRT v23 installed on a WRT54G v4. I tried to take screenshots of each step as I went, so as not to confuse anyone. Following the instructions found at Steps_to_flash_through_Web_Interface, I was eventually successful in getting DD-WRT installed. I will use some of the text from those instructions as well as inserting my screenshots and other encounters not mentioned in the above link.
1) Download the DD-WRT v23 firmware
- You must use the mini version when upgrading from original linksys firmware!
- Download the Mini Version 23 HERE (dd-wrt.v23_sp2_mini.zip ) or go to the DD-WRT downloads section at http://www.dd-wrt.com/dd-wrtv3/dd-wrt/downloads.html
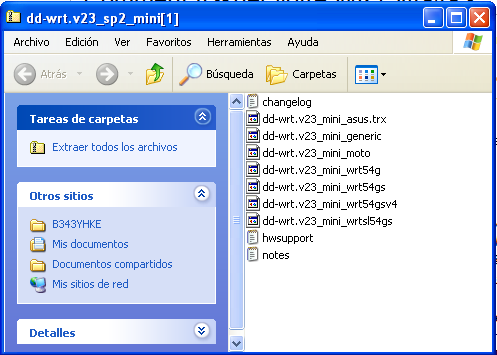
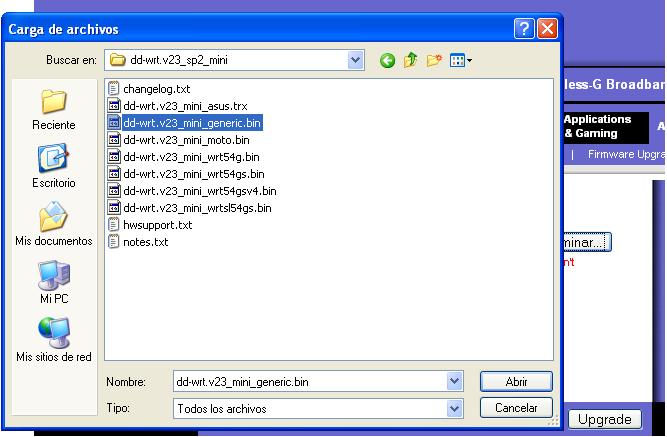
- Extract the archive. Once it is downloaded and extracted from the zip archive it should look something like this:
2a) Reset through the Web Interface
if you forgot the password or IP of your router, proceed to step 2b.
- From a PC connected to one of the 4 LAN ports on the router open a web browser and go to the IP of the router (default IP is 192.168.1.1).
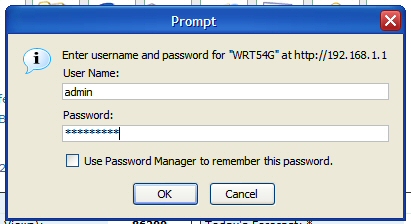
- You will be prompted for username and password. Username is not required. Enter password (default password is admin) and you should be at the Web Interface of your WRT54G v4
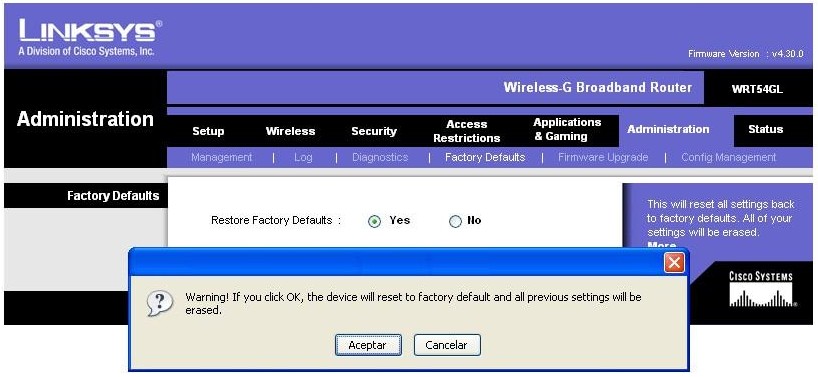
- Click the "Administration" tab.
- Click the "Factory Defaults" sub-tab.
- Select "Yes".
- Click the "Save Settings" button.
- A warning will pop up, click "ok".
2b) Reset to factory defaults
- Press and hold the reset button on the back of the router for 30 seconds. This will clear your NVRAM, the configuration and reset the password to admin.
Be aware that if your router currently has an OpenWRT firmware running on it, then using the reset button may brick your router. Research your current firmware to be safe.
3) Upgrade Firmware
- From a PC connected to one of the 4 LAN ports on the router open a web browser and go to the IP 192.168.1.1.
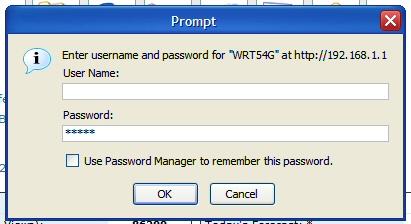
- You will be prompted for username and password. Leave username blank, enter password admin. Now you should be at the Web Interface of your WRT54G v4.
- Click the "Administration" tab
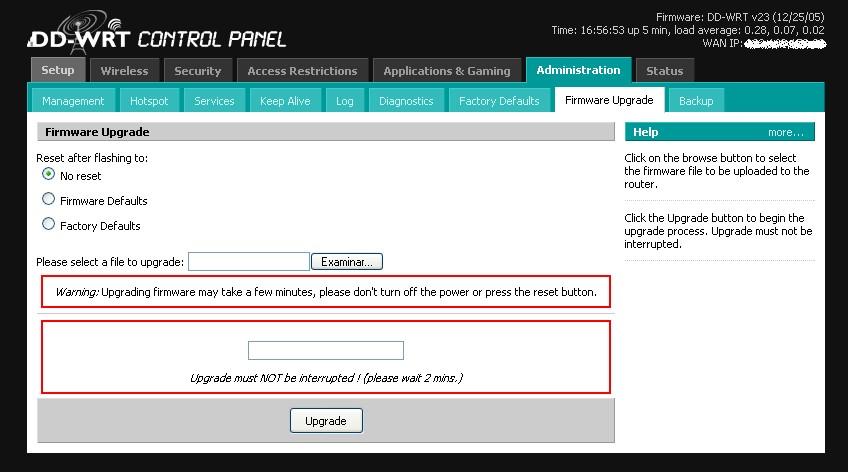
- Click the "Firmware Upgrade" sub-tab.
- Click the "Browse" button and select "dd-wrt.v23_mini_generic.bin" file you extracted in step 1.
- Click the "Upgrade" button.
- The router will take a few minutes to upload the file, flash the firmware, and then reset.
- Here is where my experience was a bit different than the instructions said it would be. I never got success message, instead of got a failed message. This is when I started to get a bit nervous that I had bricked my brand new router! So I started reading furiously through all the documentation I could get my hands on about recovering a bricked WRT when I relaunched "192.168.1.1" and found that DD-WRT was working! Don't ask me... but the flashed seemed to have worked perfectly despite the error message I got.
http://angrycamel.com/howtos/dd-wrt/images/DD-WRT_WRT54G_v4_-StockUpgradeFailed.png
- Additional note #1: as of version v23 SP1 the default login username/password has changed from <blank>/admin to root/admin.
- Additional note #2: if you are flashing the router using Firefox, it may warn you a dozen times that some scripts are very slow, giving you the option to stop that script, or continue. You should press continue (or use alternate browser). To fix the unresponsive script issue in Firefox, navigate to
about:config, then increase the integer value ofdom.max_script_run_timefrom5to20. - Additional note #3: make sure you are plugged in directly to the router with a network cable. Going through a switch or hub doesn't count (and believe it or not it doesn't work...I spent several hours following these instructions going through a switch with failure after failure. Please plug in directly to the router!).
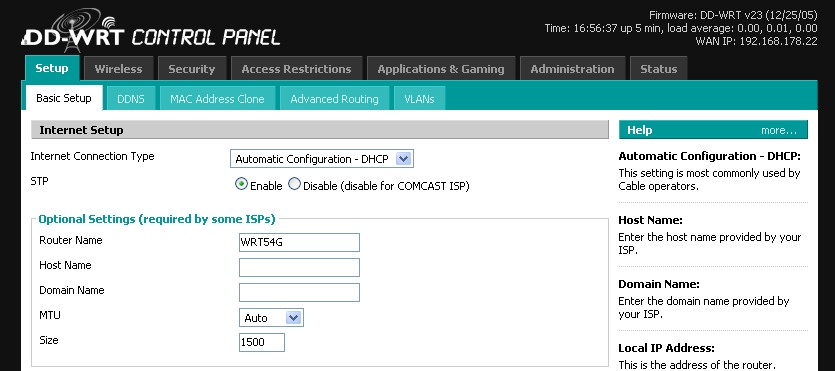
- If flashed successfully you will now be at the DD-WRT web interface and the Router Name will be DD-WRT.
4) Reset to factory defaults AGAIN
- Repeat step 2 above. Note: step 2b (the manual way of clearing the NVRAM) is recommended to make sure the radio gets the correct parameters.
5) Upgrade the Firmware to DD-WRT STD v23
- It is strongly advised that you enable the "Boot Wait" option under the "Administration" tab before continueing. This will help you recover in the future should you flash your router improperly. If you use v23 or higher the "Boot Wait" option is enabled by default.
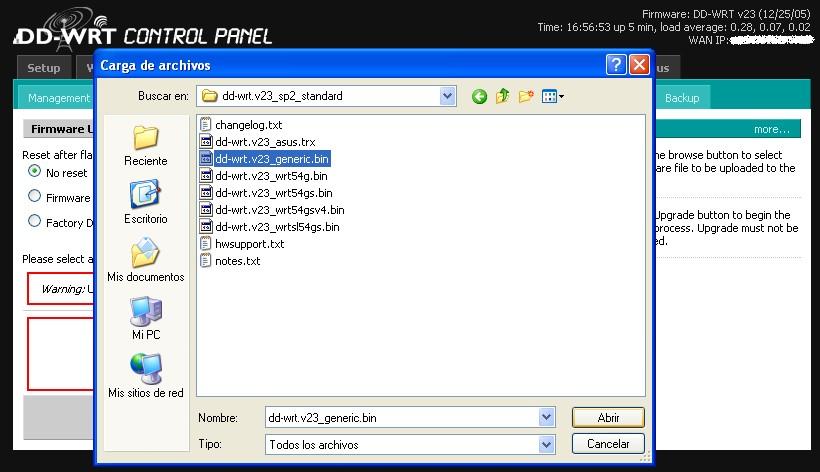
- Download the STD Version 23 HERE (dd-wrt.v23_sp2_standard.zip) or go to the DD-WRT downloads section at http://www.dd-wrt.com/dd-wrtv3/dd-wrt/downloads.html
- Extract it
- Click the "Administration" tab
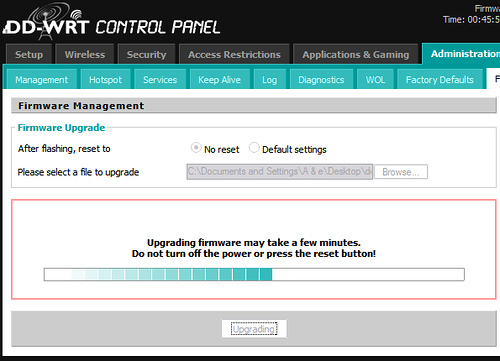
- Click the "Firmware Upgrade" sub-tab.
- Hit the browse button and select dd-wrt.v23_generic.bin that you just extracted.
- You should see the progress of the flash like so:
- If the upgrade went well then you should see a success message. You're done!
6)Troubleshooting
- If your router fails to reboot (power light doesn't stop flashing, no web interface, etc) you will need to Recover from a Bad Flash.
IBM Secure Data Disposal - Normal Image
흔적없이 하드를 지운다.
Secure Data Disposal (SDD)은 하드 디스크 드라이브의 안전한 데이터 폐기를 위해 SDD 시동 플로피 디스켓을 만드는 윈도우 도구입니다. 이 패키지는 Microsoft Windows 2000, XP 또는 2003 서버를 위해 업데이트된 버전의 Secure Data Disposal 드라이버를 제공합니다.


 32_bit.zip
 ipTIME_WLAN_KOR.vol1.egg
 N100UM.pdf
